Last updated: 2022-05-05, First draft 2022-05-04
Contact: info@gluroo.com
Available at: https://gluroo.com/support/gluroo-with-diy-loop-artificial-pancreas-system/
Caution: Dosing decisions should not be made based on this device. The user should follow instructions on the continuous glucose monitoring system.
Caution: This device is not intended to replace self-monitoring practices as advised by a physician.
GLUROO IS NOT AVAILABLE COMMERCIALLY AND IS MADE AVAILABLE ONLY FOR ALPHA TESTING AND FOR USER FEEDBACK.
WARNING: THIS INTEGRATION IS EXPERIMENTAL AND CONTAINS BUGS, MISLEADING INFORMATION, MISSING INFORMATION AND WORSE.
DO NOT DOSE OFF OF DATA PRESENTED TO YOU IN GLUROO.
Introduction
[skip ahead to the next section if you just want to get Gluroo working with Loop]
Gluroo is a versatile cross-platform mobile application that helps Glucrews of users support a Person With Diabetes. One common DIY approach to managing diabetes is using Automated Insulin Delivery Looping (i.e., an artificial pancreas solution) using the open-source Loop software.
The primary Loop app runs on an iOS device that is kept in close proximity to the Primary User as it Bluetooth-connects to both a Dexcom CGM sensor and either a RileyLink (for Omnipod Eros pods), an older-generation Medtronic Pump, or directly to an Omnipod Dash pod (using the dev branch).
Dexcom CGMs support a separate Follow app that can be run on Android or iOS devices to remotely monitor the blood glucose values reported by a CGM sensor, but that app does not provide any insight into pump behavior.
A more powerful solution for Loop users is to use Loop’s native capability to write into a Nightscout service and then use the Nightscout service web-based user-interface to monitor the status of both the CGM and the Looping. There are nightscout plug-ins to enable better Loop functionality (and others for openAPS, etc). Nightscout has the advantage of being a web-deployed cross-platform app, but it lacks many niceties of native mobile applications.
Another approach is Jon Fawcett’s Loop Follow app. It, like Loop, is an iOS-only solution. Loop Follow allows multiple other devices to track the Loop app by reading the data from the Nightscout instance that Loop writes to. It provides native alerting, great Apple Watch functionality via Calendar integration of recent sensor readings, charting, and more.
Both the Nightscout solution and Loop Follow require setting up a private instance of Nightscout running on a cloud service such as Heroku. Thankfully, Ben West et al. have set up a managed Nightscout service, T1Pal, that can trade some of that hassle for a low monthly fee.
Using Gluroo to Follow Loop
Gluroo takes a different approach from Loop Follow.
IMPORTANT: Gluroo does not actually run a Nightscout service and you do not need Nightscout running on a cloud service to use this integration. You need not set up Nightscout to use this integration.
With Gluroo you simply set up your Glucrew to be the set of folks you want working together, and you select “DIY Loop” as your Pump under:
Menu ⁞ > Connections > Insulin > Insulin Delivery option:
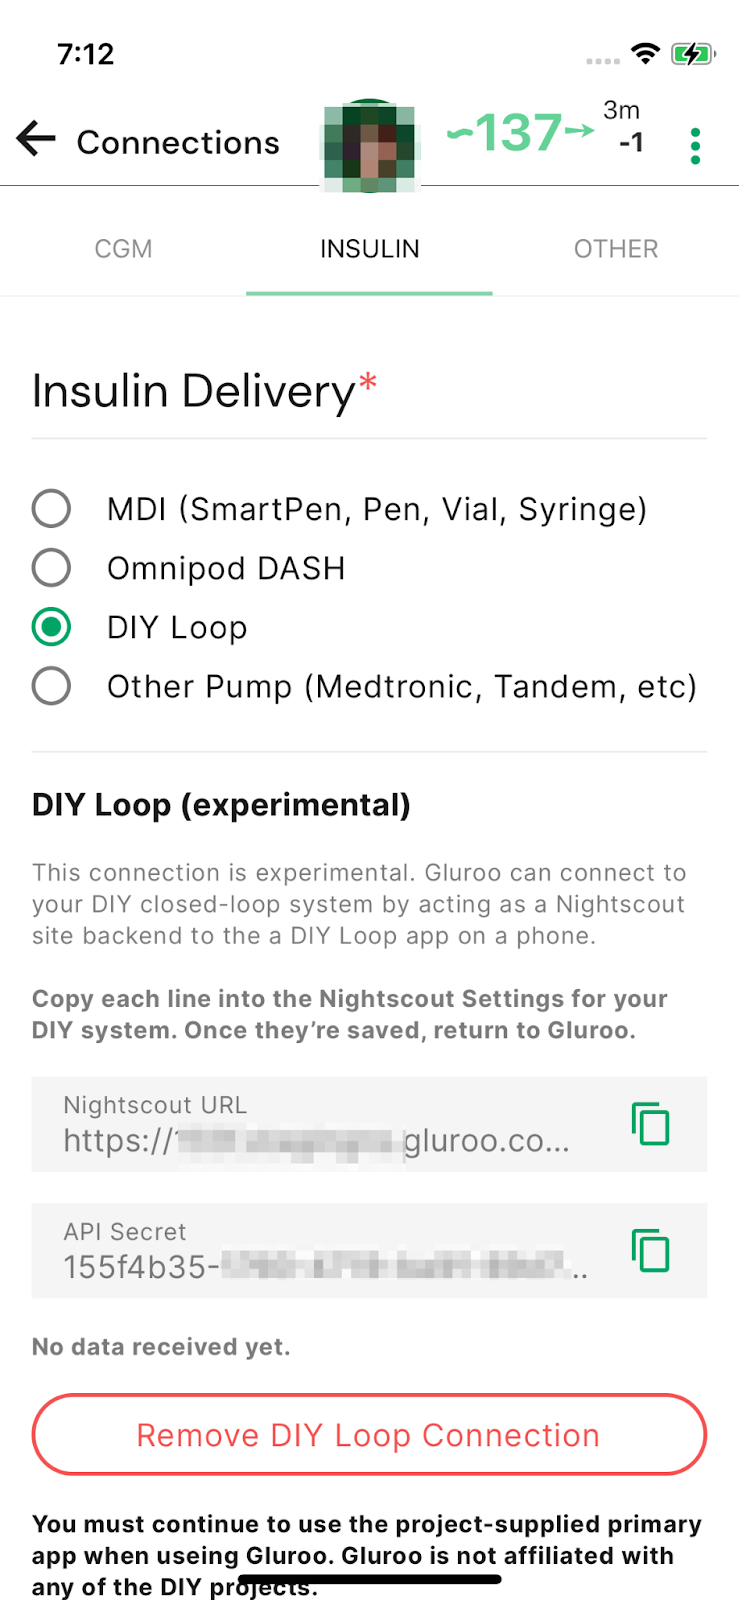
Figure 1. Demonstrating insulin delivery options in Gluroo.
Selecting that option provides you with a “Nightscout URL” and an “API Secret”. You simply copy each of those values and paste them into the corresponding field in Loop’s Nightscout Service. It’s helpful to make sure the Primary User’s phone has Gluroo installed on it so you can just copy from Gluroo then switch to Loop and paste into Loop. (But you can also email the two values to the Loop Device and cut and paste them from email if you prefer.)
After you’ve set up the Nightscout backend in Loop to match the values given to you by Gluroo, Loop’s Nightscout service will look something like this:
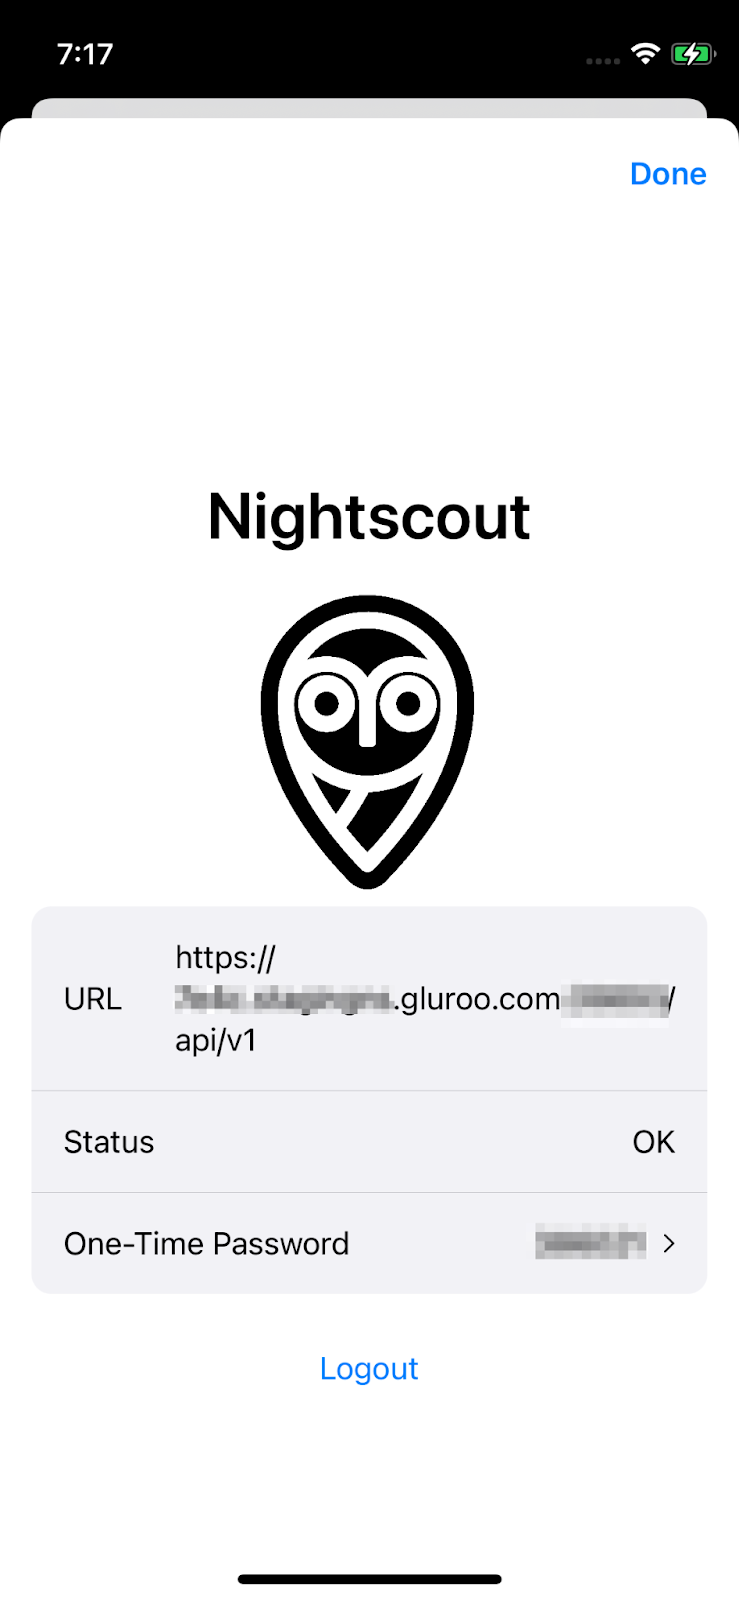
Figure 2. Screenshot of the Nightscout service tab in the Loop app after copying the Nightscout URL provided by Gluroo. Note that the Nightscout URL has “gluroo.com” in it.
IMPORTANT: Again, Gluroo does not actually run a Nightscout service and you do not need Nightscout running on a cloud service to use this integration
Once you’ve pointed Loop at Gluroo’s Nightscout-compatible API, Loop will be directly sending the real-time Loop data to Gluroo. Right now Gluroo does not use the CGM values sent by loop, but instead requires that you set up Gluroo directly to talk to Dexcom’s servers via the Follow API. You do this via Gluroo’s:
Menu ⁞ > Connections > CGM > Dexcom
And enter your Dexcom Share credentials there.
Gluroo works with both of Loop’s Dosing Strategies: “Temp Basal Only” and “Automatic Bolus”. After setting it up, the Devices tab of the Drop-Down-Status Bar (tap on the Primary User’s Avatar in the top header to open it) will look something like this:
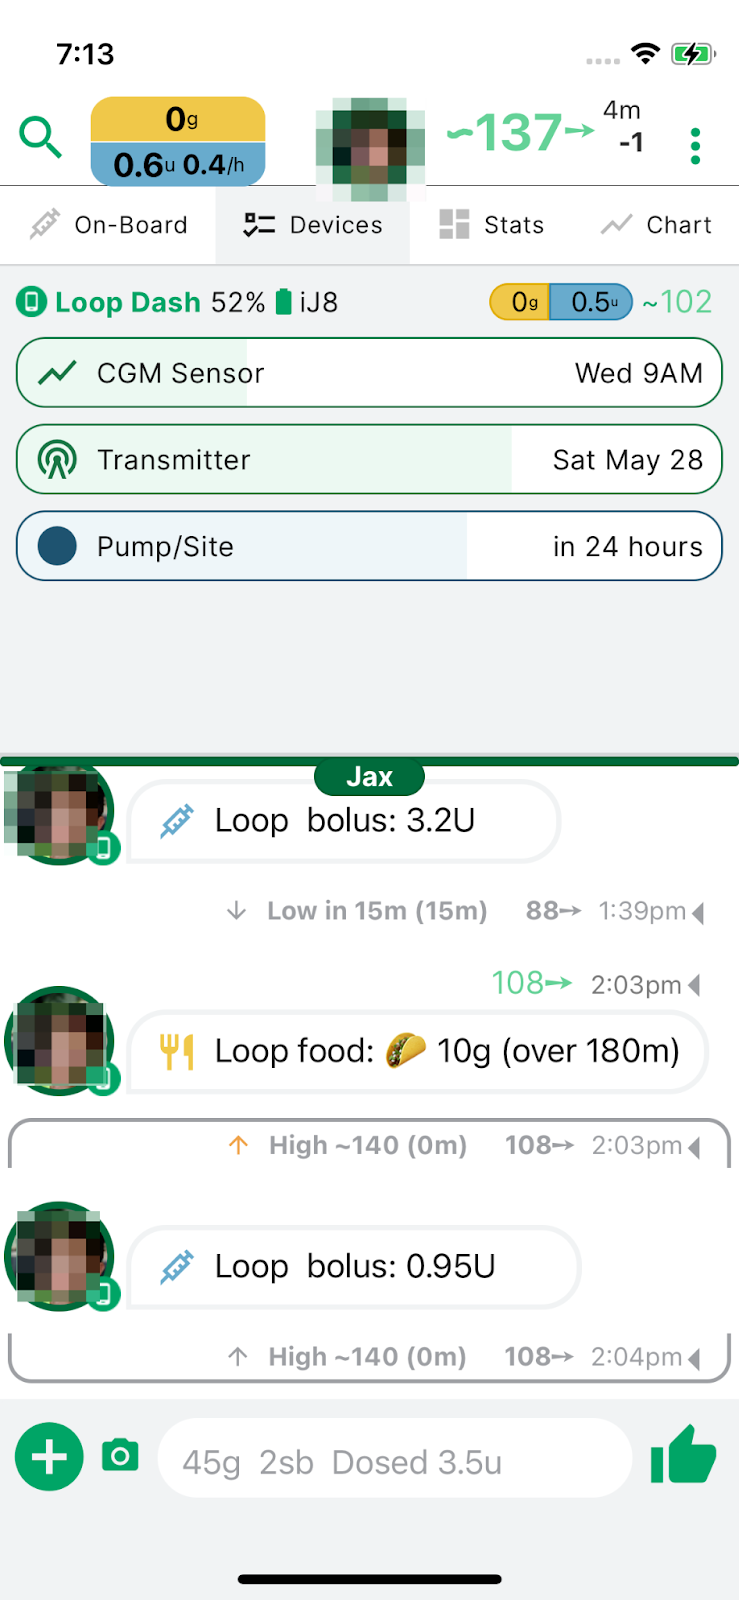
Figure 3. Gluroo’s drop-down status bar, showing “Loop Dash”.
Notice that it shows the type of pump (“Dash”, here), the battery remaining of the Looping device, the name of the Looping Device (“iJ8”, here), the amount of carbs on board (goldenrod), the amount of insulin on board (blue), and the “eventual BGL” prediction of Loop.
IMPORTANT: The carbs on board and insulin on board shown at the very top of the Gluroo display (where the yellow is stacked on top of the blue) is Gluroo’s estimate of carbs and insulin on board. That display also shows the absolute basal rate reported by Loop in units/hour of insulin. Gluroo and Loop use different models for food and insulin absorption, so these numbers will be different.
When you do a Meal Announcement or a Bolus on the Loop device, those entries will propagate instantly to Gluroo (assuming you have working WiFi or data connections on both the Loop Device and the devices running Gluroo). They show up in chronological order in the Gluroo Event Log just like a messaging app. It’ll look something like this:
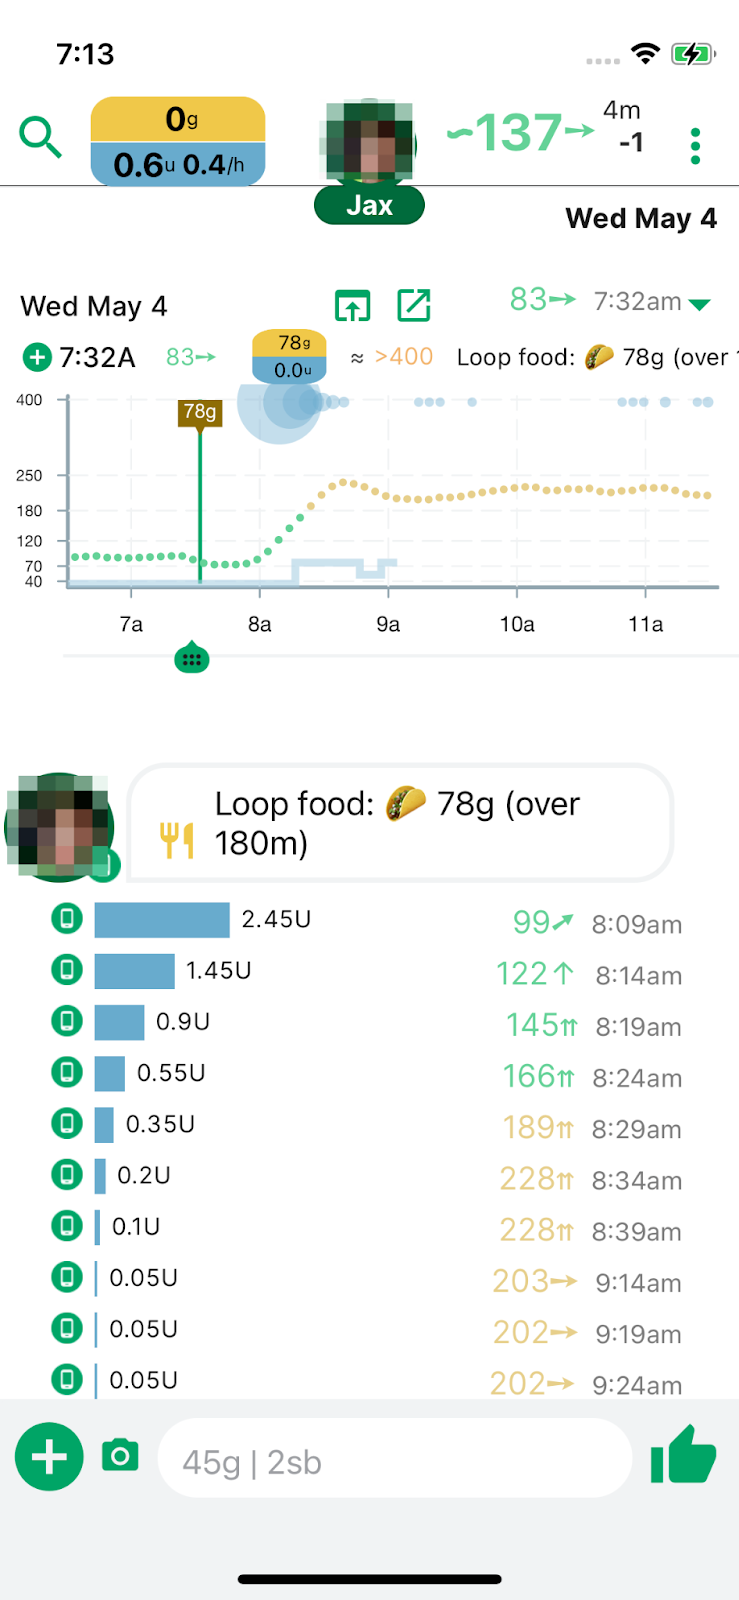
Figure 4. Screenshot demonstrating Gluroo receiving a Meal Announcement from Loop.
The Charts can be opened up using the triangle after the time on each log entry, and in the chart, temp basal is shown as a stepped blue line coming up from the bottom. Automatic boluses are shown as varying-sized circles at the top of the chart along the BGL=400 line: bigger circles correspond to larger doses.
The automatic boluses also show directly in the Gluroo Event Log in a concise format (see Figure 4 above), while the manual boluses and food announcements look like regular GEL messages that can be edited, commented on, and more.
Gluroo’s event log works a lot like an SMS messenger or iMessage/FB Messenger/WhatsApp. Each message gets marked with the Blood Glucose Level of the sensor at the time when it was sent, and you can long press on messages to edit them, or swipe left/right to change the time of a log entry.
The large green “+” button in the bottom left gives you a quick, friendly way to enter more log items, but as you become more comfortable with Gluroo, the Natural Language Processing capabilities make logging lots faster. You can just type “25g bagel” and send that message to log the fact that a bagel was eaten.
Also try using the Camera button in the bottom left and scan your Dexcom label and/or QR code for logging a new sensor – it also works with Omnipod lot number labels.