A guide on what to bring when traveling with Type 1 Diabetes.

I’ve been traveling as a Type 1 Diabetic for nearly 15 years.
I’ve never had a problem with airport security or TSA – they see diabetics and diabetes supplies all the time. What I have had a problem with is underestimating the number of supplies to bring and having to pick something up locally. It’s not going to end your trip, but it is an annoyance that you’re better off being prepared for.
Here’s my own personal, tried-and-true checklist that you can follow to make sure you’ve got everything you need in your diabetic travel kit.
The Diabetes Travel Checklist
A good travel kit should include everything you’ll need to properly manage your diabetes, wherever you’re going. I designed my kit for a diabetic like myself who uses a continuous glucose monitor (CGM) and takes multiple daily injections (MDI) using insulin pens. But most of the supplies listed below are necessary for all diabetics. In general, you’ll want at least the following:
- A durable bag
- Extra insulin
- A backup method (or two) for checking your blood sugar levels
- Fast-acting sugars
With that said, here is what I keep in my travel bag at all times!
1. A Zippered Diabetes Travel Bag

This is what you’ll use to hold everything. If you Google “diabetes supply travel bag” you’ll find all sorts of stuff. But, I prefer to use something that’s more like a toiletry bag. I find that travel-specific toiletry bags are better designed, lighter weight, and higher in quality than the generic “diabetes bags” you’ll find elsewhere.
My personal favorite is a Mountainsmith toiletry bag. Here are some other good options: Sea to Summit Hanging Toiletry Bag, Osprey Ultralight Zip Organizer, Peak Design Small Wash Pouch, Maxpedition Pocket Organizer.
2. Insulin

Pods, vials, pens, or whatever other types of insulin you need. I recommend bringing at least 2x what you estimate you’ll use while you’re gone.
3. Needles (If You Use MDI)
Same as above. Bring at least 2-3x what you think you’ll need.
4. Continuous Glucose Monitor (CGM) Supplies
If you use a CGM, make sure to bring enough extra sensors, transmitters, receivers, etc. Again, at least 2x what you expect you’ll need for that period. We all know how often a sensor can fail to insert, not calibrate, or start acting up and need replacing.
5. Fast-Acting Sugars

Snacks for addressing low blood sugar. I recommend glucose tablets or glucose powder because they’re easy to travel with. They also work faster to raise your blood sugar than other regular snacks.
For glucose tabs, I always carry some 10-count tubes. They are a super convenient size. You can throw in some powder packets like these, though as a general diabetes rule of thumb I recommend treating lows 4g or 8g at a time. Fifteen grams is usually too much to take at once, but will of course do the job in an emergency. Sometimes I’ll throw in a Gatorade powder packet or two as well.

6. A Backup Method For Checking Your Blood Glucose Levels (BGL)
These days you can get a blood glucose meter at just about any pharmacy in the world. That said, you should always carry a backup. I use a Dexcom G6 that doesn’t require calibration. But I always carry a manual BG meter so that I can double check my readings if they look off. I can also go back to manual checking if my sensor fails. You know what they say – two is one and one is none.
I carry a CVS meter and backup test strips because CVS is ubiquitous pretty much everywhere in the United States. Alternatively, Accu-Chek meters can be found at nearly all pharmacies and grocery stores.
7. Snacks (Optional)
I always carry a few extra snacks – usually nuts, granola bars, or protein bars. These days I bring a few RX bars or two as a meal replacement if I can’t find something in the airport that I like.
It’s a good idea to bring something that you regularly eat. That way you know exactly how much insulin to use to cover it and you’re almost guaranteed to maintain a stable blood sugar level after eating it. For me, I eat RX bars pretty regularly so I know exactly what my BGL will do and how to handle it.
8. Cooling pack (optional)
Depending on when and where you’ll be traveling, it may be a good idea to bring a cooling pack.
Airport security usually doesn’t like liquid cooling packs (frozen packs tend to unfreeze at the worst times…) so I use a Frio Cooling Wallet (small or large). These work via evaporative cooling and don’t use any ice or frozen products. Eventually all the water in it evaporates away and you’re left with a small cloth bag with gel beads in it. No big deal for the TSA.
9. Doctors Note (Optional)
I’ve personally never had a need for one of these, but it could come in handy in an emergency. There are always horror stories of diabetics being hassled unnecessarily about their supplies. My preparation for this is to be courteous and treat other people with respect – they’ll usually do the same.
10. Notecard With Emergency Info
I keep a small index card that has my name, cell number, my condition, and an emergency contact clearly written out. I like Rite in the Rain Index Cards – they’re super high quality, thick, water-repellant, and hold up great.
11. An Awesome App That Lets Other People See Your BGL at All Times!
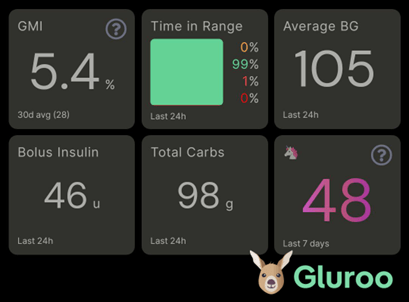
Last but not least, I have to recommend Gluroo as the best app for collaborative, comprehensive diabetes management. Specifically for travel, I love using it because my partner and anyone else I want to add to my GluCrew can see my readings at all times and message me about it if something seems off.
I can even tell Gluroo to automatically call them in an emergency, like if I have an extreme low overnight and I’m not responsive. It’s always a good idea to have another set of eyes on your numbers, just in case.
Other Things to Consider While Traveling
One other issue that often comes up when traveling is when to take your basal dose(s) if you’re in a new timezone. Depending on how long you’ll be gone, you may want to adjust your basal dose +/- 1 hour per day until it’s back to your normal time. For example, I take a basal dose at 9PM every night. If I’m going somewhere +5, then I’ll take it at 2AM the first night, then 1AM the next, then 12AM, etc. each night until I’m back to 9PM local time.
Also, a lot of times when we’re traveling, we are more active than normal. Walking in the airport, hiking, or exploring tourist attractions can throw off your normal activity levels. For this reason, you should check your blood sugar levels more often.
It may be worth it to learn how to say “I have diabetes” in the local language, in case you need to explain it to someone in an emergency. Or, you could have a diabetes tag or necklace with the medical symbol that you can point to.
Final Thoughts
Having diabetes can change the way you travel. If you’ve got a good kit with you at all times though, you shouldn’t have too much of an issue. I hope you got some good ideas for things to add to your travel kit. Is there anything else that you carry that I didn’t mention here? Feel free to leave a comment below!
And don’t forget to download Gluroo for free today. Worry less and live life more!
