Continuous Glucose Monitoring (CGM) has revolutionized the way people with diabetes manage their blood sugar levels. CGM technology uses a tiny sensor inserted under the skin to measure glucose levels in the interstitial fluid, providing real-time data to help individuals make informed decisions about their insulin and dietary needs. You can read more about CGMs on our other blog post.
Over time, CGM sensors may need to be replaced due to wear and tear or the end of their lifespan. Replacing a CGM sensor on your child can be a daunting task, but with proper guidance and preparation, it can be done quickly and easily.
In this article, we’ll provide a step-by-step guide on how to replace a CGM. Before we start, it’s essential to note that the specific steps and processes may vary depending on the CGM brand and model. Therefore, it’s essential to refer to the manufacturer’s instructions for specific guidance.
When Should You Replace a CGM Sensor?
The length of time a sensor can be worn before it needs to be replaced can vary depending on the manufacturer and type of CGM. However, most CGM sensors have a recommended wear time of 7-14 days before they need to be replaced.
You should replace a CGM sensor under the following circumstances:
- Expiration date: The first reason to replace a CGM sensor is when it has reached its expiration date. The sensor package usually includes an expiration date on the outside of the box or on the sensor package itself.
- Sensor failure: Occasionally, CGM sensors may fail prematurely due to various reasons such as insertion failure, sensor error, or sensor signal loss. In these cases, the sensor should be replaced as soon as possible.
- Infection or irritation: If your child develops an infection or irritation at the insertion site, the sensor should be removed immediately. Symptoms of infection may include redness, swelling, warmth, pain, and discharge. Irritation symptoms include itching, rash, or blistering.
- Accuracy issues: If the CGM readings are consistently inaccurate, the sensor may need to be replaced. This may occur due to various reasons such as signal interference or sensor displacement.
- Comfort issues: If the CGM sensor becomes uncomfortable or causes pain or discomfort, it should be removed and replaced.
But the sensor isn’t the only part of the CGM that may need to be replaced.
CGM transmitters typically have a battery life of up to 90 days and can be reused with new sensors. However, if a transmitter fails, stops working, or loses connectivity, it should be replaced immediately.
The lifespan of the transmitter battery may also vary depending on the manufacturer, so it’s important to keep track of the battery life and replace it before it runs out.
In summary, it’s important to replace CGM sensors when they reach their expiration date, fail prematurely, cause irritation or infection, have accuracy issues, or become uncomfortable. Transmitters, on the other hand, should be replaced when they stop working, lose connectivity, or run out of battery life.
Regularly monitoring the CGM sensor and transmitter status can help ensure accurate glucose monitoring and avoid potential health risks.
How to Safely Remove a CGM?
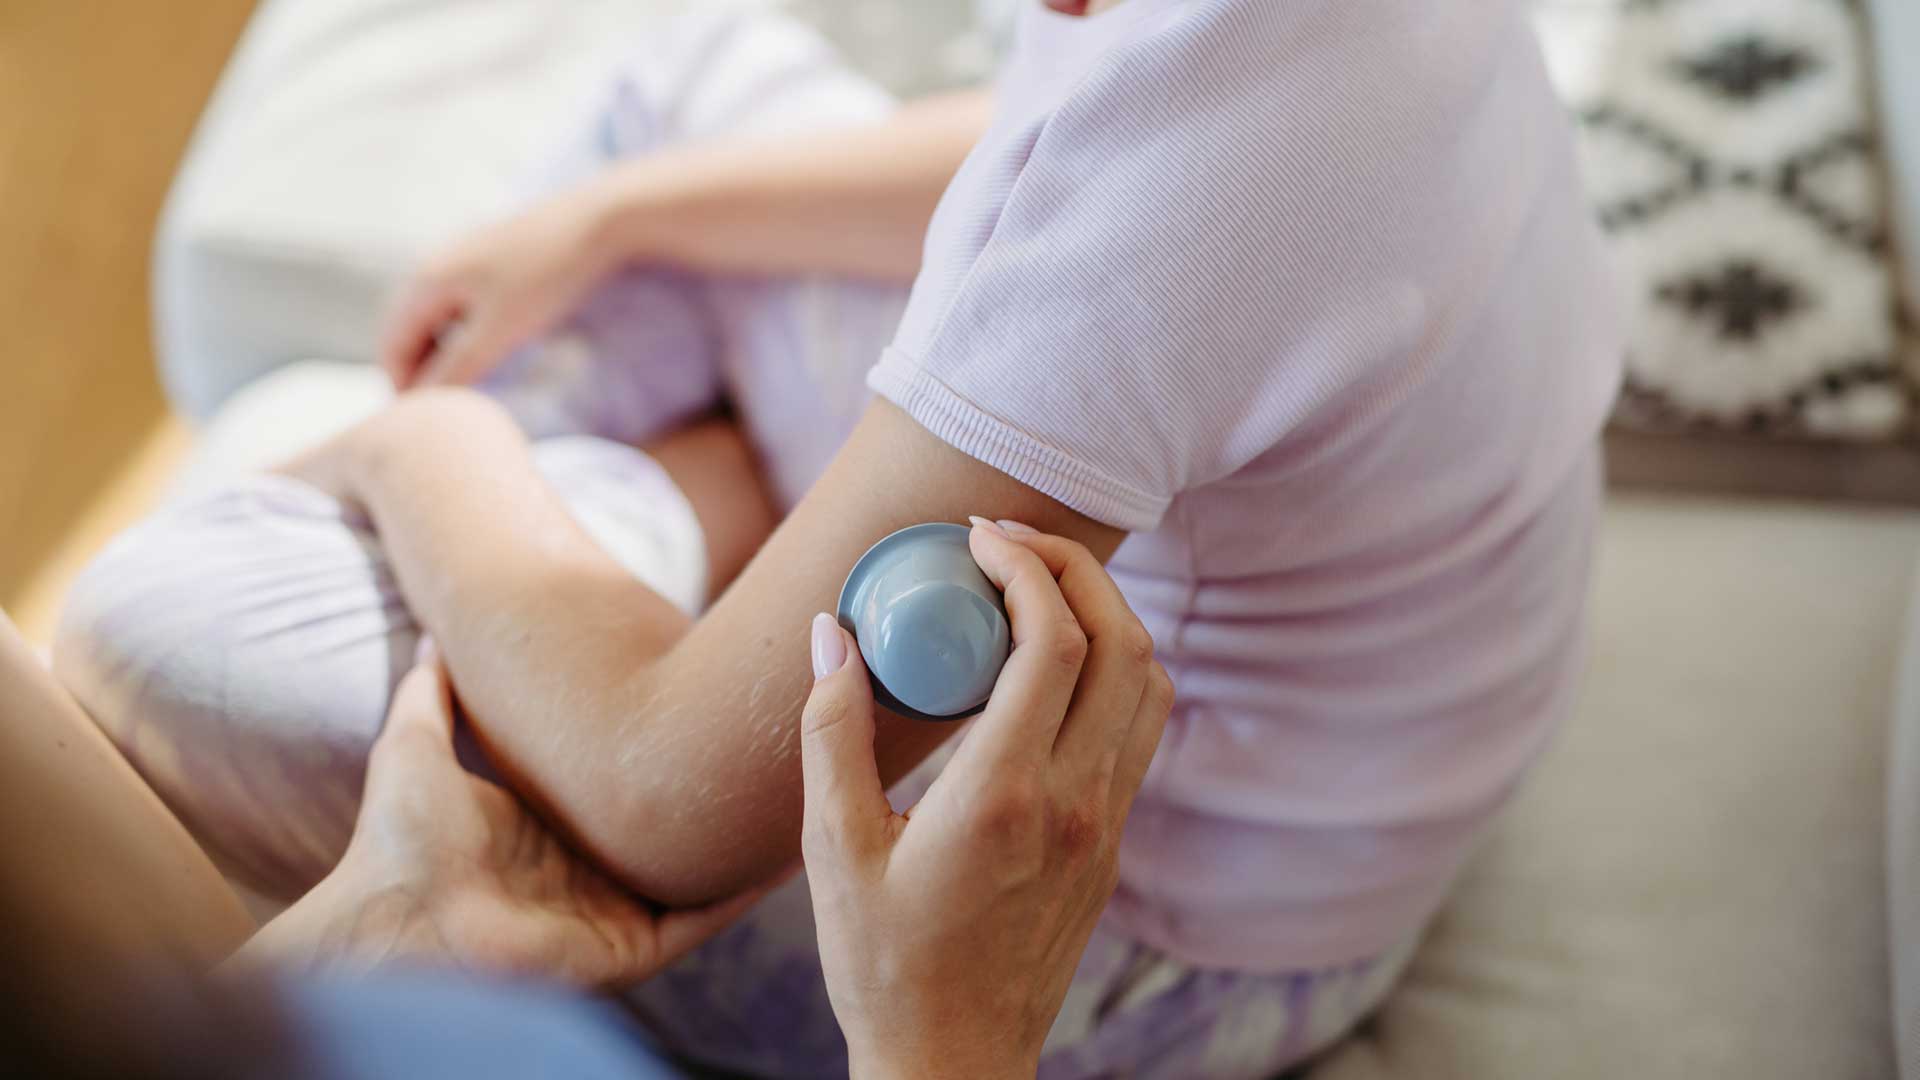
Removing a CGM sensor is a critical step in the diabetes management process. It’s essential to remove the sensor safely to avoid pain, injury, or infection. Here are the general steps for removing a CGM sensor safely:
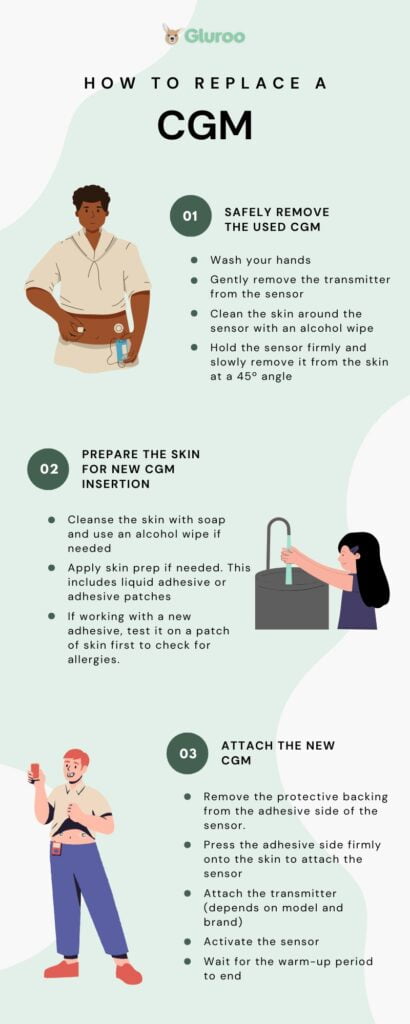
- Wash your hands with soap and water to minimize the risk of infection.
- Prepare the materials needed for removing the sensor, such as adhesive remover wipes, alcohol wipes, or an adhesive removal spray.
- Gently remove the transmitter from the sensor. Depending on the model and brand of the CGM device, there may be a release button or tab that you need to press or lift to separate the transmitter from the sensor. If you’re using a Dexcom G6, you can wait to remove the transmitter until after you’ve peeled off the sensor.
- Clean the skin around the sensor with an alcohol wipe or an adhesive remover wipe to remove any residual adhesive or dirt.
- Hold the sensor firmly and slowly remove it from the skin at a 45-degree angle. Do not pull the sensor straight up, as this may cause pain or skin irritation.
- If your child feels any pain or resistance while you’re removing the sensor, stop immediately and consult their healthcare provider.
- After removing the sensor, clean the skin with an alcohol wipe or soap and water to remove any remaining adhesive residue.
It’s important to note that the steps for removing a CGM sensor may vary depending on the brand and model. Each manufacturer may have specific instructions on how to remove their CGM device safely. Therefore, it’s recommended to visit the manufacturer’s website or consult the device’s user manual for specific instructions on how to remove their CGM device safely.
For example, Dexcom, Freestyle Libre, and Medtronic all have detailed instructions on how to remove their CGM devices safely on their respective websites. It’s essential to follow these instructions carefully to avoid any complications and ensure a smooth and painless removal process.


Preparing the Skin to Reattach a CGM
Preparing the skin for attaching a CGM device is an essential step to ensure proper adhesion and accurate glucose readings. Proper skin preparation can also help reduce the risk of infection, allergic reactions, or skin irritation.
Here are some tips for preparing the skin before attaching a CGM device:
- Cleanse the skin: Cleanse the skin using soap and water, and then dry thoroughly. If necessary, use an alcohol swab to remove any excess oils or dirt from the skin. Avoid using any products that contain lotion, cream, or oil, as they may interfere with the adhesion of the CGM device.
- Apply skin prep: Some people may benefit from using a skin prep product before attaching the CGM device. Skin prep products help create a barrier between the skin and the adhesive, reducing the risk of skin irritation or allergic reactions. The type of skin prep product may vary depending on the individual’s skin type and the CGM device brand.
- Warm up the adhesive: Some CGM devices may come with adhesive warming patches. These patches can help soften the adhesive and make it more pliable, making it easier to attach the device. Follow the manufacturer’s instructions on how to use the warming patches.
- Check for allergies: Some people may be allergic to the adhesive used in CGM devices. To reduce the risk of allergic reactions, test the adhesive on a small area of the skin before attaching the device. If there is any redness or irritation, consult with your child’s healthcare provider.
Following these steps can help ensure a successful and safe CGM device attachment.
Step-by-Step to Attaching a New CGM Sensor
Now that we discussed safe removal and skin preparation, you should note that proper attachment can help ensure accurate glucose readings and reduce the risk of skin irritation or infections. Here are some general steps to attach a new CGM sensor:
- Remove the protective backing: Remove the protective backing from the adhesive side of the CGM sensor. Be careful not to touch the adhesive with your fingers.
- Attach the sensor: Press the adhesive side firmly onto the skin. Use your fingers to apply pressure around the sensor to ensure proper adhesion.
- Attach the transmitter: Depending on the model and brand of the CGM device, you may need to attach the transmitter to the sensor. Follow the manufacturer’s instructions carefully to ensure proper attachment.
- Activate the sensor: Once the sensor and transmitter are attached, activate the sensor following the manufacturer’s instructions. This may involve scanning the sensor with a smartphone app or pressing a button on the transmitter. With Gluroo, you can simply scan the QR code on a Dexcom sensor to log that you’ve successfully changed sensors.
- Wait for the warm-up period: Most CGM devices require a warm-up period before the device can begin reading glucose levels. Follow the manufacturer’s instructions on how long to wait before taking any readings.
Make Sure You Rotate Sites Frequently
Replacing a CGM sensor or transmitter is an essential aspect of your child’s diabetes management. Knowing when to replace a sensor or transmitter can help ensure accurate glucose readings and reduce the risk of skin irritation or infections.
Taking the time to properly prepare the skin and following the recommended steps for removal and attachment can make the process safer and more effective.
Also, keep in mind that you should rotate your child’s attachment sites frequently to avoid infections and/or skin irritation and allergies.
If you struggle to keep up with previously used attachment sites, our app Gluroo can be a great tool to help you properly rotate CGM placements. All you need to do is log every attachment site in the app.
Gluroo can also help keep track of meals, exercises, insulin pump sites, and open insulin vials and it integrates with CGMs and insulin pumps so you and other caretakers can view your child’s real-time data remotely.
You can download Gluroo for free today.
