Last updated: 2022-12-02 (new op4.pac location), 2021-10-04, First draft 2021-09-04
Contact: info@gluroo.com
(If you use the Omnipod 5 (OP5 – latest generation) Patch Pump, see the Instructions on Setting Up Gluroo as a Second Screen for the Omnipod 5 instead.)
Caution: Dosing decisions should not be made based on this device. The user should follow instructions on the continuous glucose monitoring system.
Caution: This device is not intended to replace self-monitoring practices as advised by a physician.
GLUROO IS NOT AVAILABLE COMMERCIALLY AND IS MADE AVAILABLE ONLY FOR ALPHA TESTING AND FOR USER FEEDBACK
Introduction
Omnipod View is an iOS-only app that provides a second-screen interface to the Omnipod Dash Insulin Delivery System. Gluroo has an experimental (and not yet in coordination with Insulet) integration with the Omnipod Dash system that enables one-way synchronization of the activity you enter on the Omnipod Dash PDM to show in Gluroo. Using this experimental integration means you do not have to “double-enter” meals and boluses both in the PDM and in Gluroo in order to get the benefits of Gluroo. Furthermore, if one or more of your diabetes supporters is using Android, the Gluroo PDM connection is the only way to see the PDM activity on an Android phone.
Warnings
This integration is EXPERIMENTAL AND ALPHA QUALITY. That means you cannot trust it. In particular, like the Omnipod View app, the connection between the PDM is made through cloud servers run by both Insulet and Gluroo and the data can be old, stale, or wrong because of network connectivity issues or server issues within and beyond our control.
YOU MUST ALWAYS REFER TO THE LIVE DATA ON THE ACTUAL INSULET-SUPPLIED OMNIPOD DASH SYSTEM BEFORE MAKING DOSING DECISIONS INCLUDING BASAL CHANGES, BOLUSES, INTERVENTION SNACKS, AND ALL OTHER MEDICAL DECISIONS. GLUROO DOES NOT PROVIDE MEDICAL ADVICE AND YOU ACCEPT ALL RISK FOR USING THIS EXPERIMENTAL INTEGRATION.
This integration redirects your phone’s interactions with the prod.omnipodapps.com servers (which Insulet uses to synchronize Omnipod View with the Dash PDM) to route through a “proxy” that Gluroo operates. This exposes the data intended to be shared with and only with Insulet to be seen by Gluroo, and that allows Gluroo to automatically add the events you enter in the Omnipod DASH PDM into Gluroo directly. You need to be aware that you are circumventing privacy and security by using this integration, and you must accept the risks of doing so. All information shared with Gluroo remains subject to our privacy policy and our terms of service.
Important: IF THE GLUROO PROXY FAILS (AND IT WILL FROM TIME TO TIME) THE OMNIPOD VIEW FROM THE DEVICE USING THE PROXY WILL FAIL TO UPDATE. THIS IS WHY IT IS ESSENTIAL TO ALWAYS USE THE PDM DIRECTLY TO MAKE DOSING DECISIONS.
Important: IF THE DEVICE RUNNING OMNIPOD VIEW WITH THE GLUROO PROXY CHANGES ITS NETWORK CONNECTION, TURNS OFF (E.G., OUT OF BATTERY), OR STOPS RUNNING OMNIPOD VIEW, GLUROO MAY STOP UPDATING ACTIVITY ENTERED ON THE PDM INTO THE GLUCOSE EVENT LOG (GEL). This might not happen immediately, but the next time a “token refresh” is required (every couple days) the experimental integration will fail (and Gluroo will attempt to indicate that via a grayed-out IOB/FOB indicator in the header and messages occasionally until the problem is resolved or the connection is removed).
Requires an iPhone Running Omnipod View on WiFi
For this experimental integration to work, some member of your Glucrew must have an iOS device (iPhone or iPad) that is running Omnipod View connected to your Person With Diabetes’s PDM account (using the Insulet-provided View capabilities) via WiFi. Setting that up is beyond the scope of these instructions and is something you can coordinate with Insulet if you are having difficulties.
Ideally, this will be an always-on device that stays connected via WiFI at all times. E.g., an older iPad used as a screen
Setting It Up
Setting up this experimental integration consists of three steps:
- Request access (you probably already did this)
- On the iPhone, install the Gluroo proxy configuration and set up its certificate.
- Finalize the connection between Omnipod View and your Gluroo account
We’ll now go through these steps in detail.
Step 1: Request Access
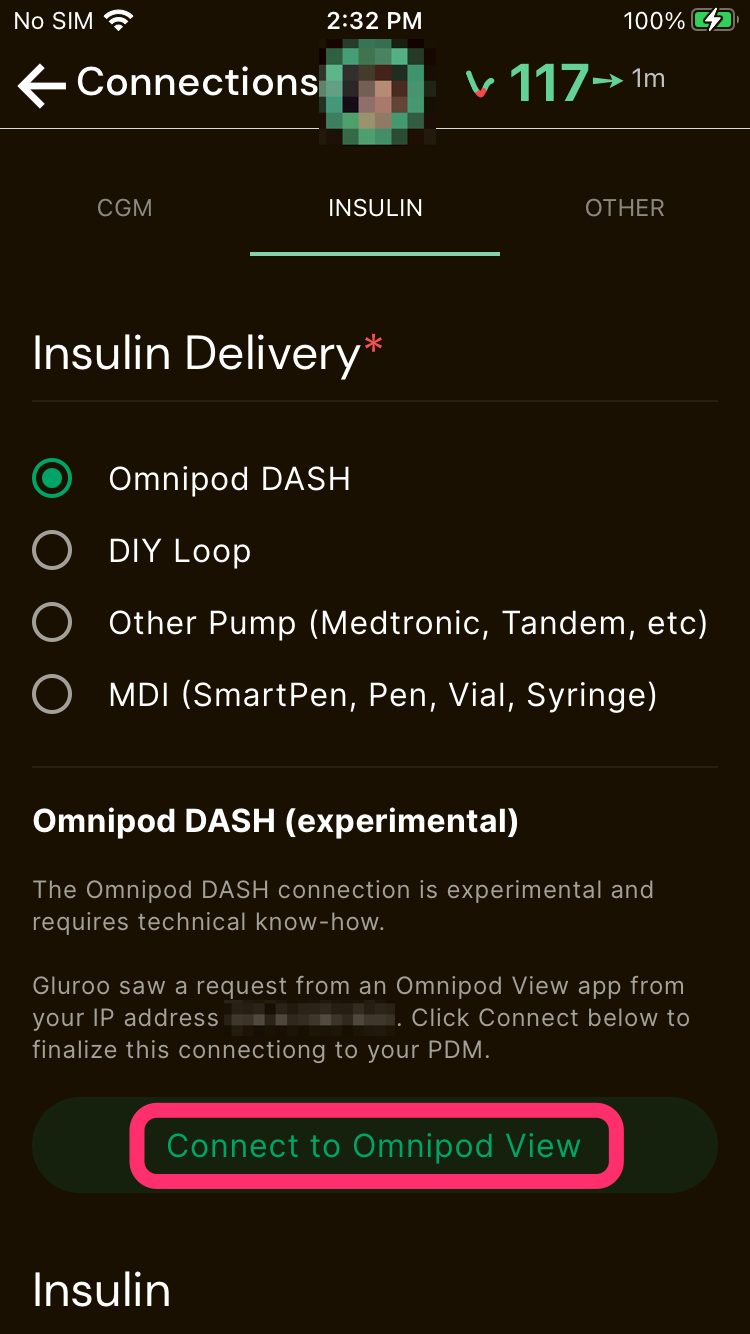
Request access (and then wait to be given access — if you’re reading these instructions you probably now have access). You request access from inside the Gluroo App: Menu (i.e., ⁞ button in top right) > “Connections” menu item > “Insulin” tab > “Omnipod DASH” radio button > “Request access” button.
While awaiting access, you should make sure you have a compatible iOS device that is working correctly with the OmniPod View app, connected to your PDM of interest.
Step 2: On the iPhone or iPad, Set up the Proxy
For this step, you’ll use the iOS device that has Omnipod View access to the PDM of interest. There are several sub-steps:
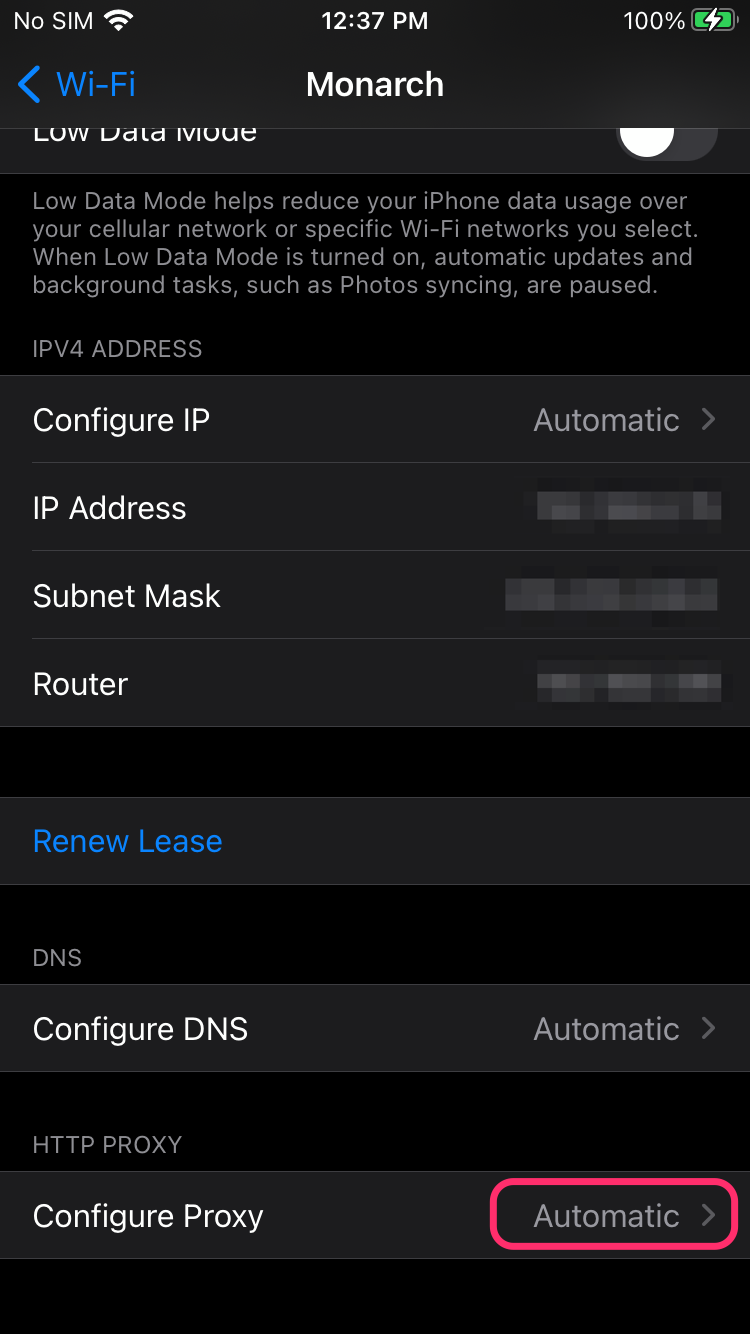
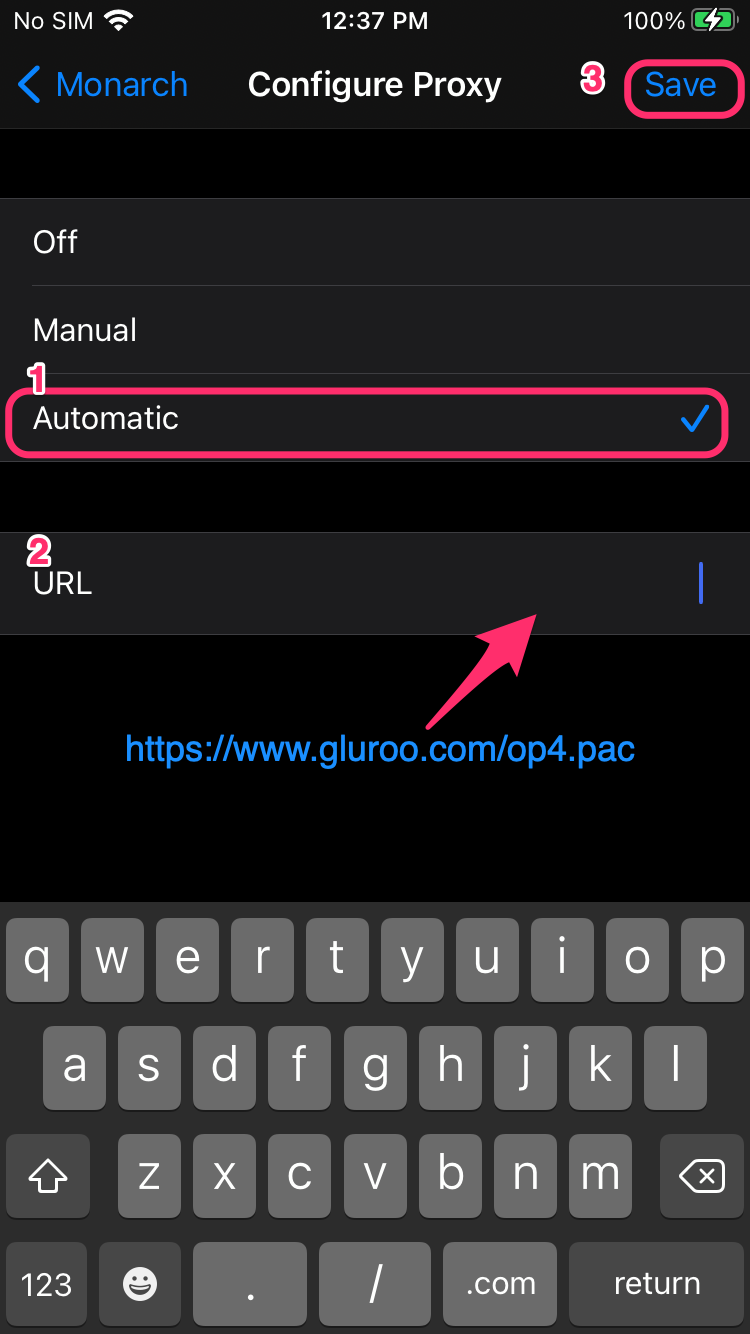
2a) Install the Gluroo proxy file from https://app.gluroo.com/op4.pac – you can copy this URL from the Gluroo Omnipod Connections Screen (it only shows up there if Gluroo is running on an iOS device).


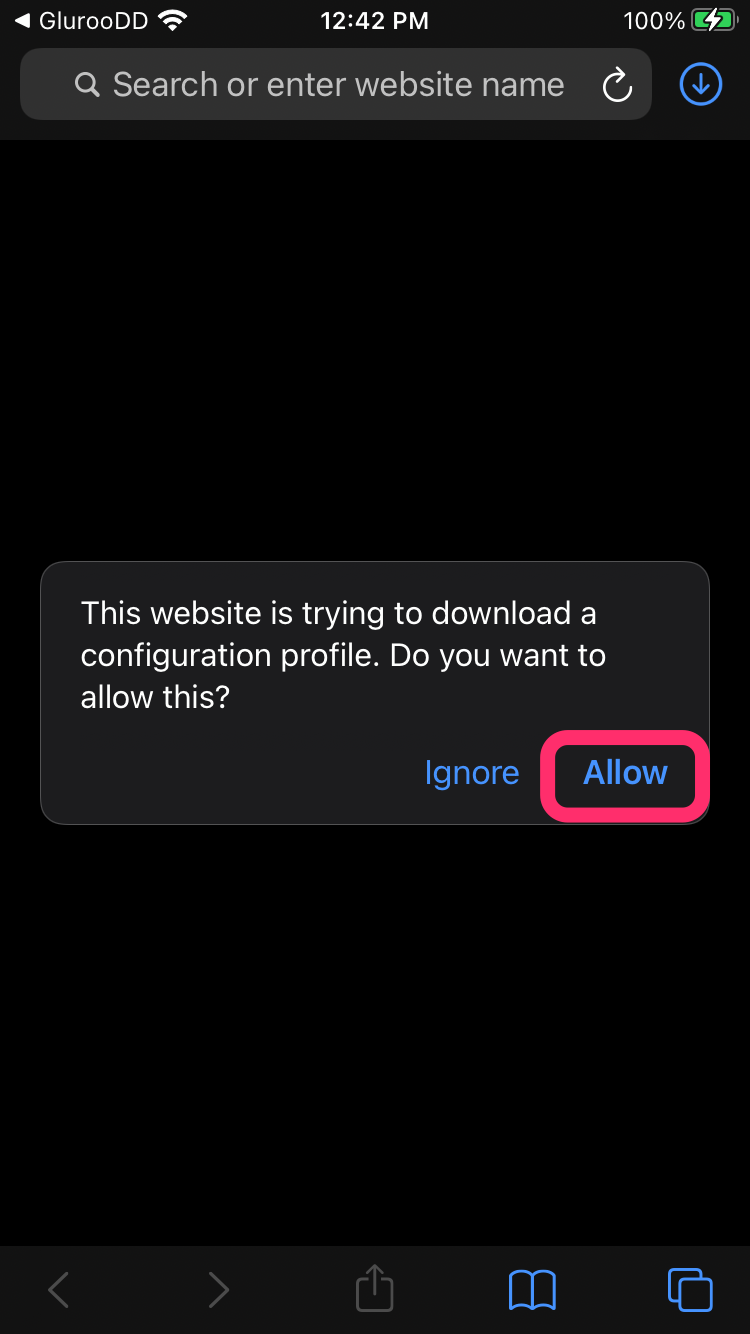
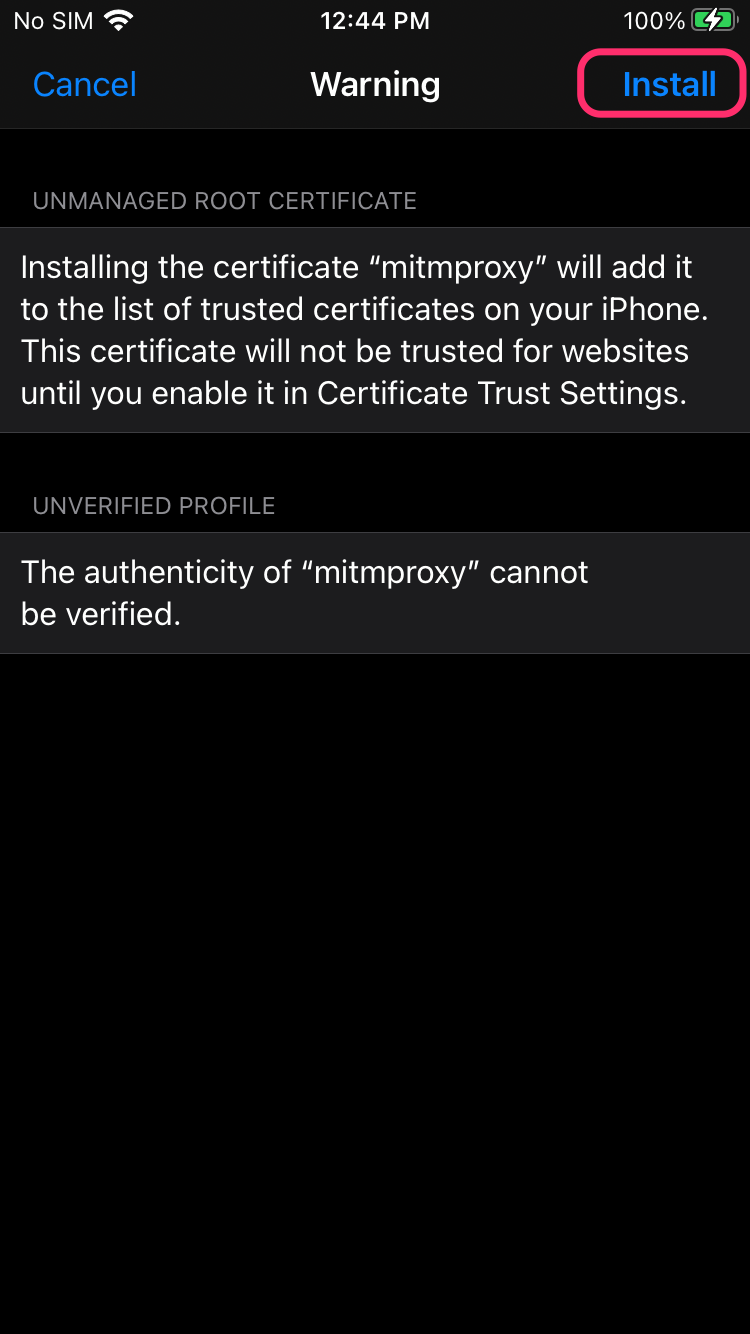
2b) Open Safari on that same iOS device and Download the SSL certificate for that proxy by visiting http://mitm.it (do NOT use https, just http)
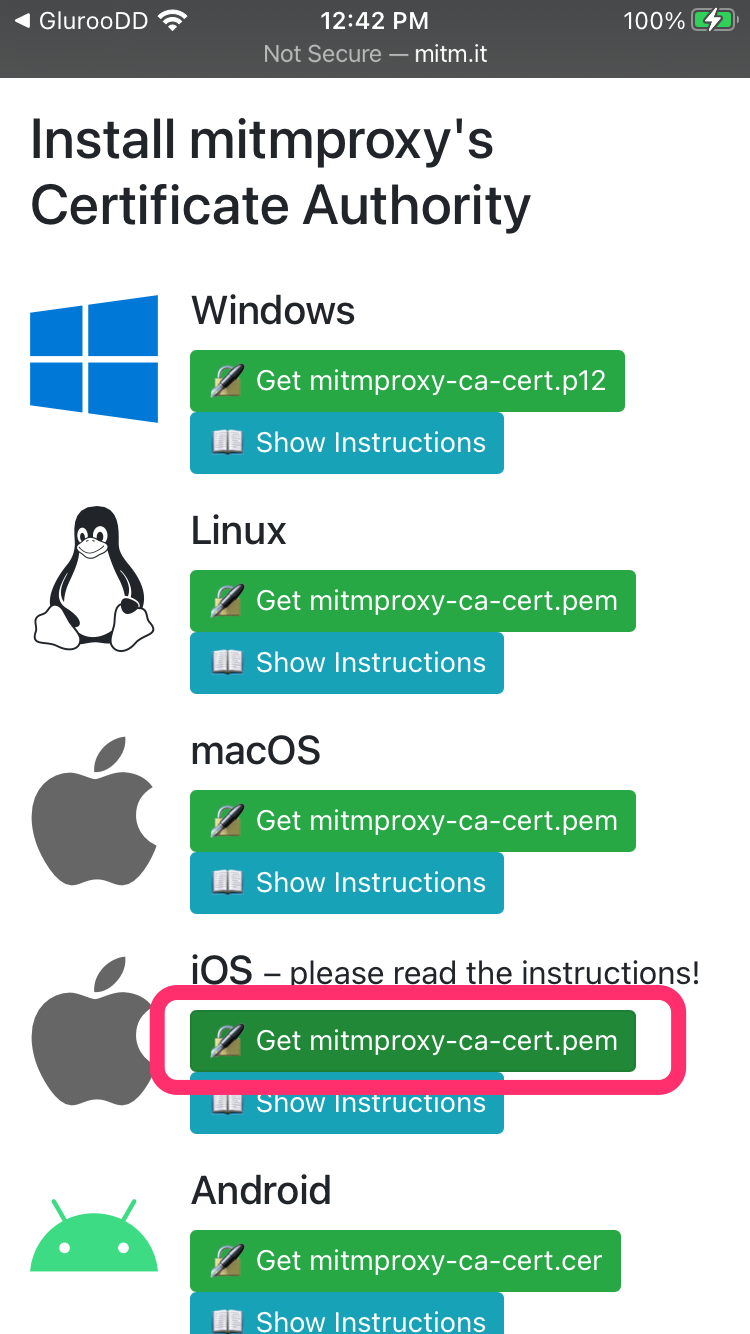
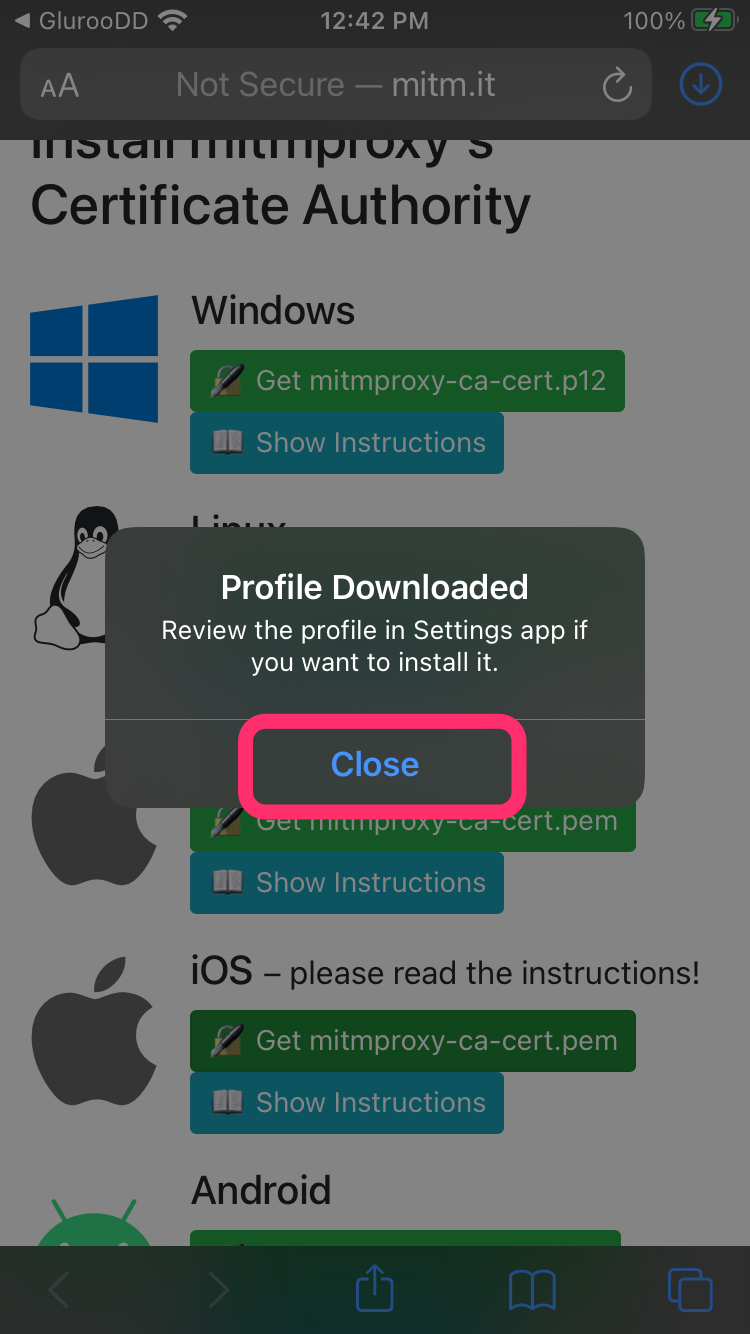
That makes the downloaded certificate available in your Settings > General > Profiles.
TROUBLESHOOTING: If you do not see the above “Install mitmproxy’s Certificate Authority” your device is not routing through the proxy that it needs to be using. Go back and make sure you followed the earlier steps correctly.
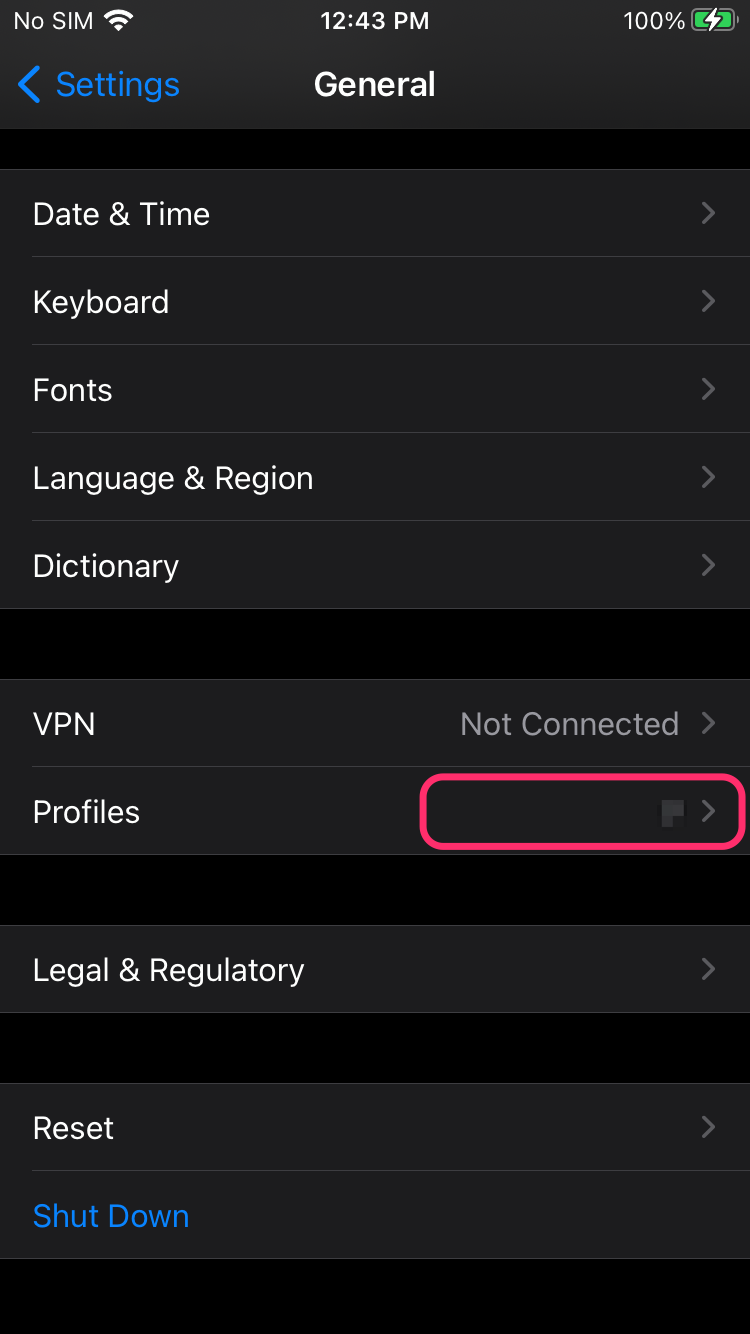
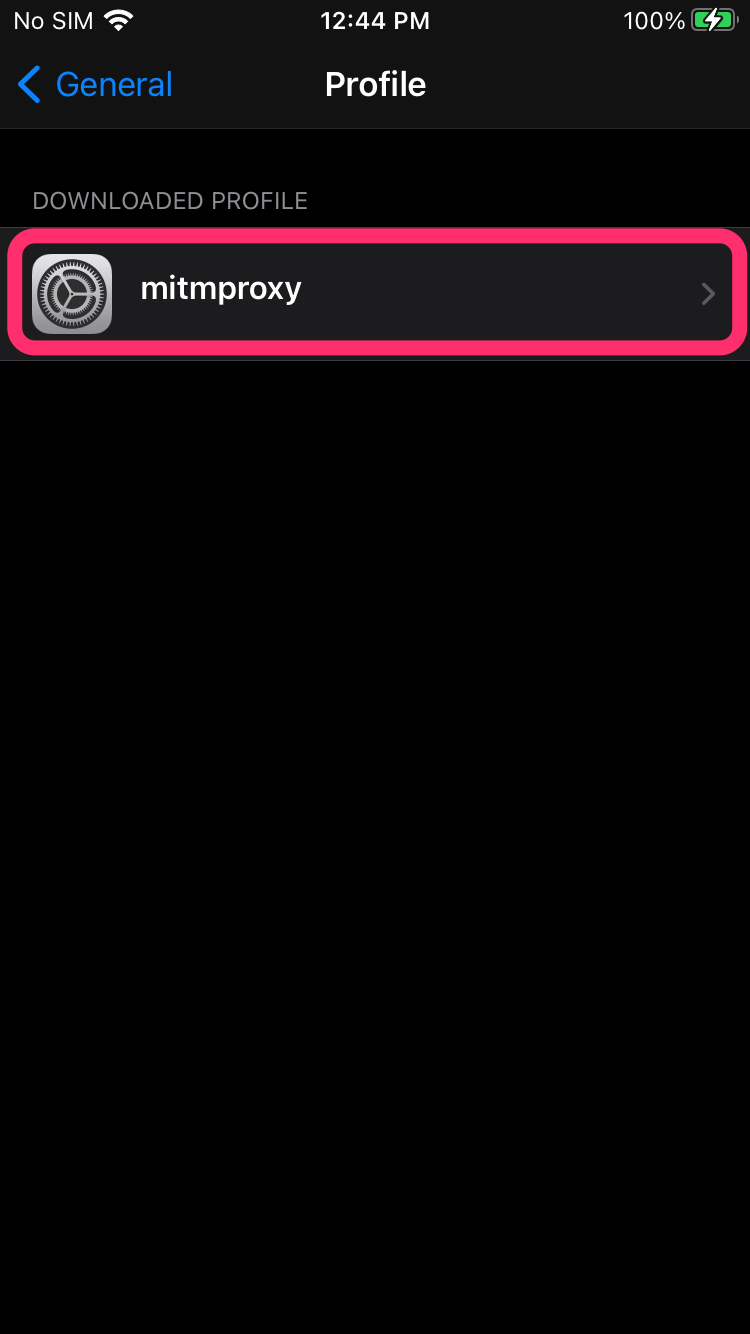
2c) Install that Certificate Profile. First go to Settings > General and look for “Profiles”
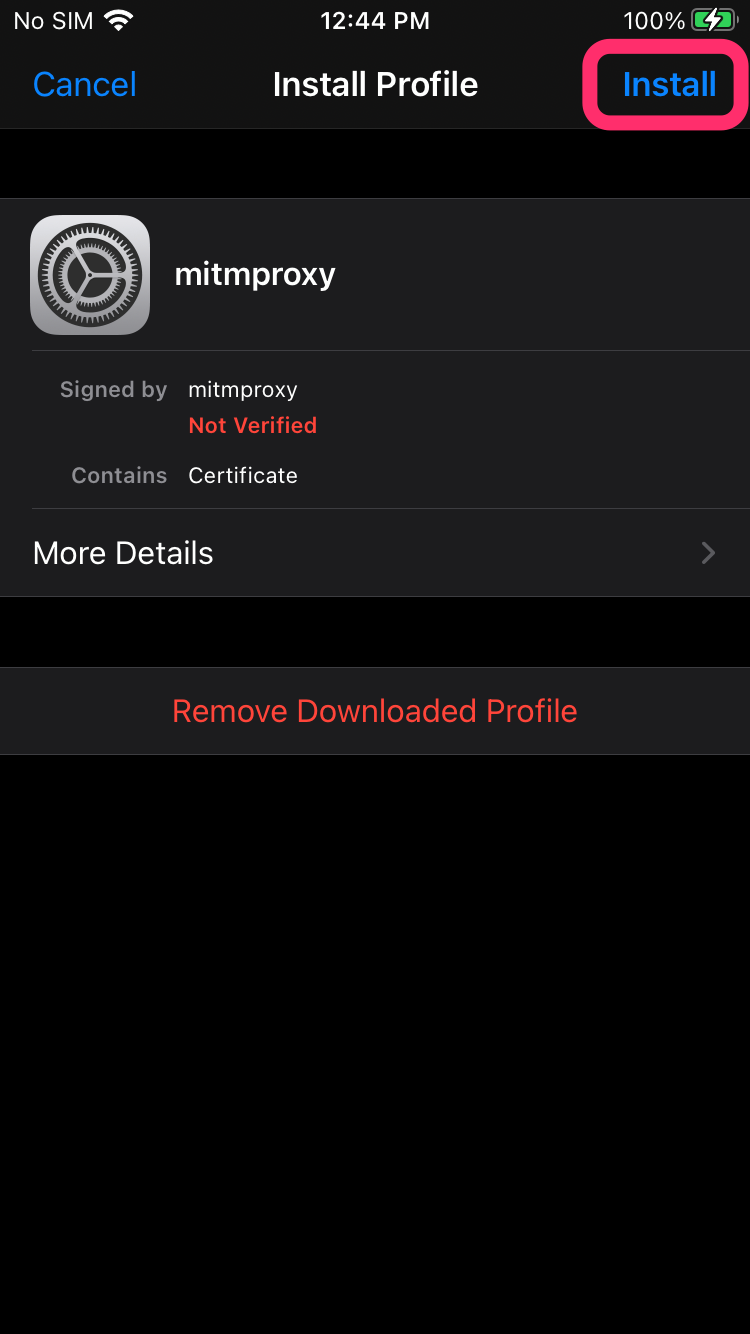
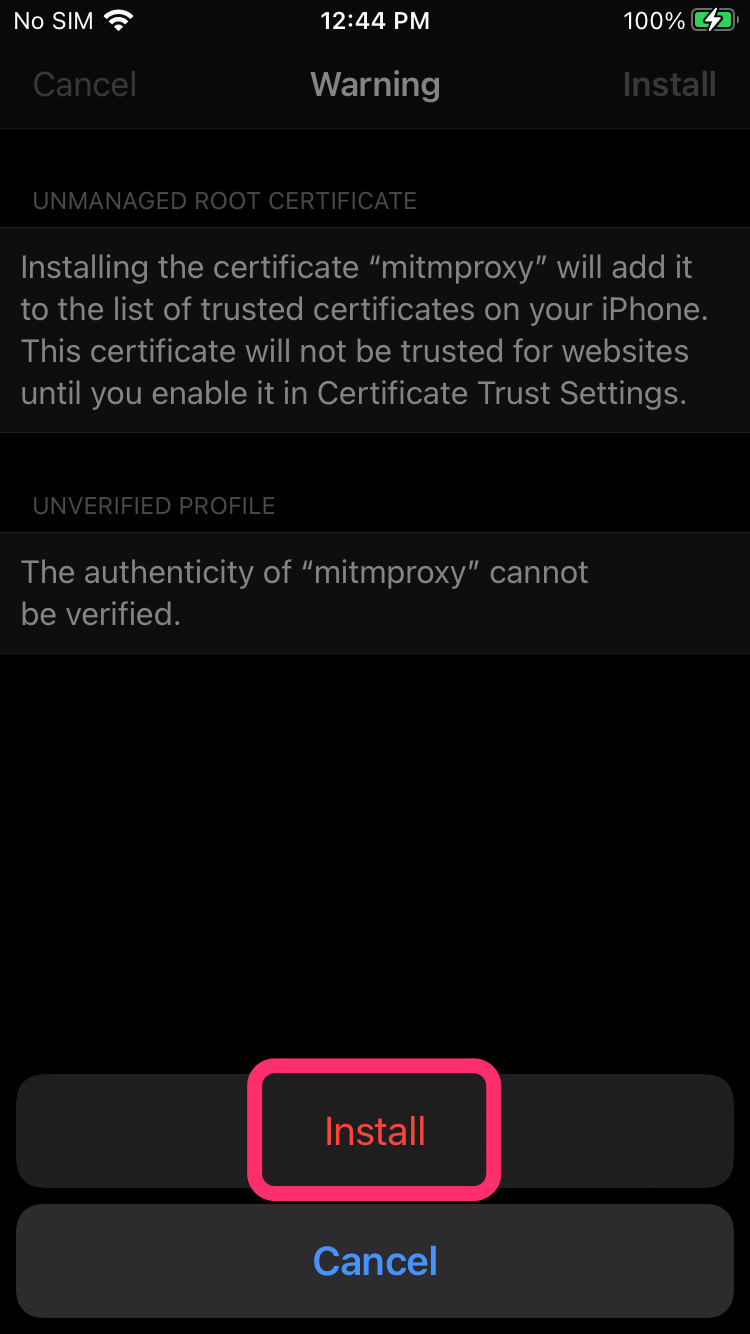
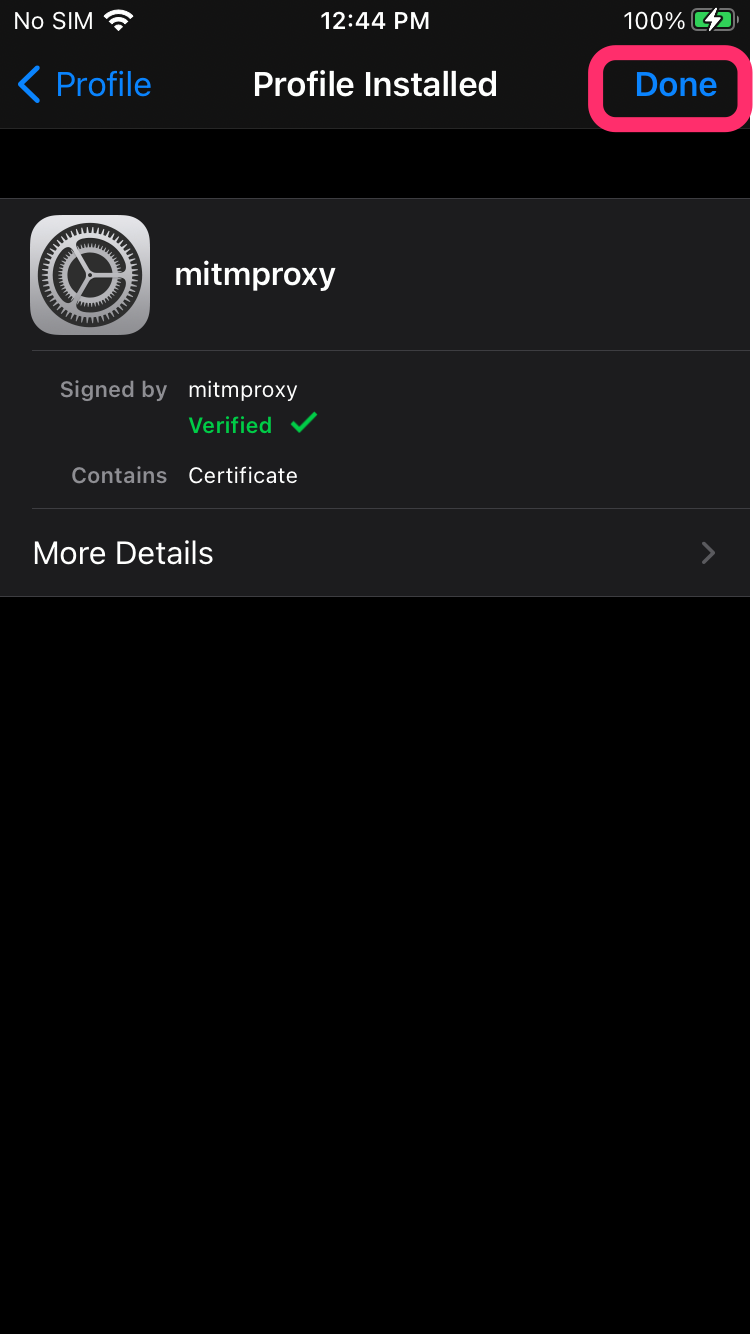
You’ll have to enter your passcode after clicking that Install button, then you’ll keep clicking more install buttons to complete the installation of that (still untrusted) Profile:
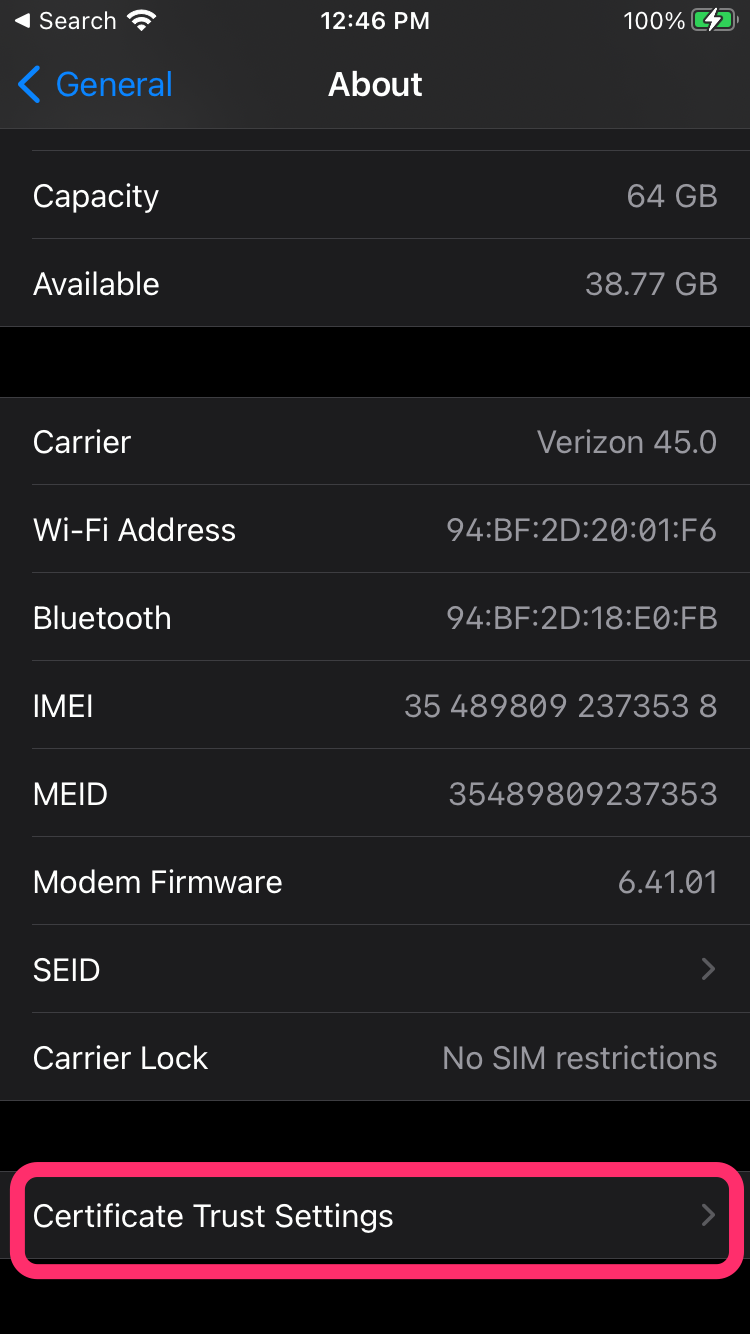
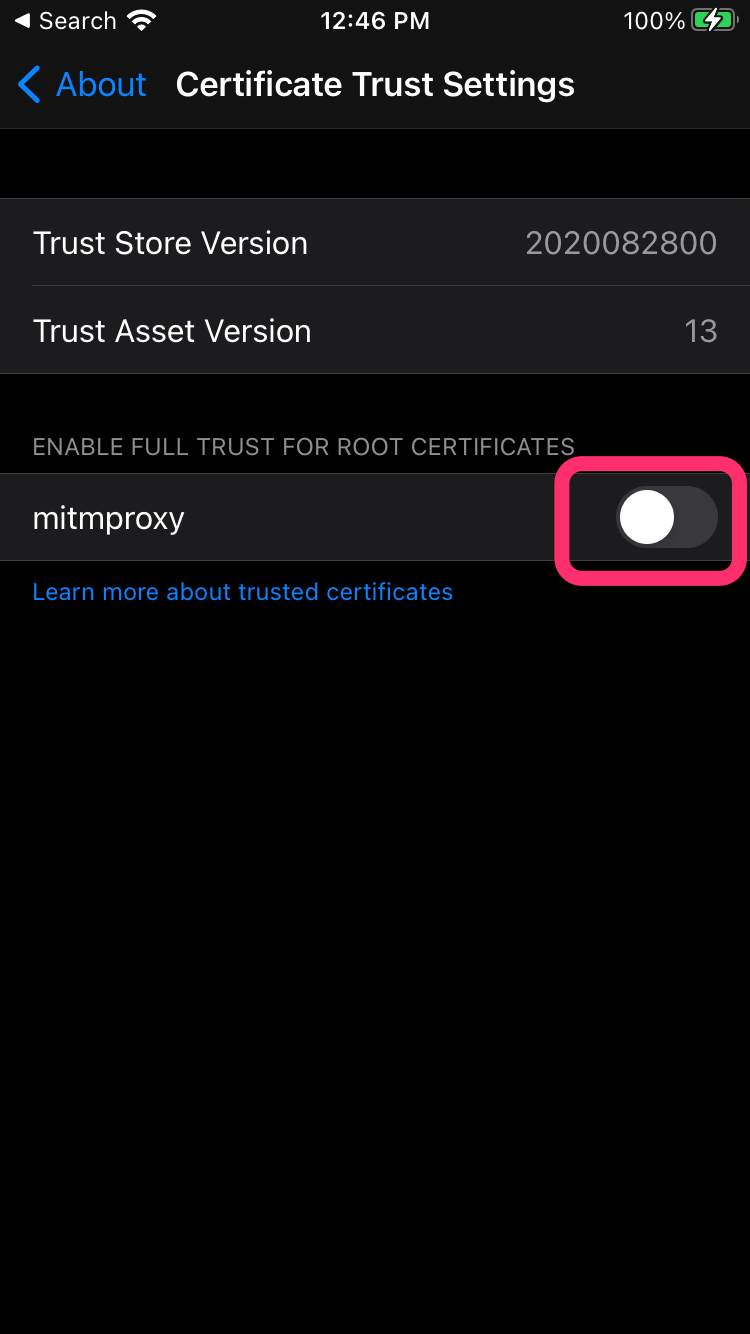
2d) Now you need to tell your device to trust that certificate using Settings > General > About and scroll all the way to the bottom to “Certificate Trust Settings”


2e) Confirm Omnipod View on that device is still working by swiping down to refresh inside Omnipod View. If that fails with an “An Error Occurred” dialog, you may have done something wrong. Retrace your steps and double-check.
And finally:
Step 3: Finalize the connection
Go back into Gluroo (on any device in the Glucrew, but it must be from the same network connection as the Omnipod View iOS device — the same iOS device is fine, too, of course).
In Gluroo, get back to the connection settings via Menu > “Connections” > “Insulin” > “Omnipod Dash” controls. Tap the “Connect to Omnipod View” button. If it does not show up, you may need to swipe down to refresh again on the Omnipod View app from the iOS device that you installed the proxy on earlier.
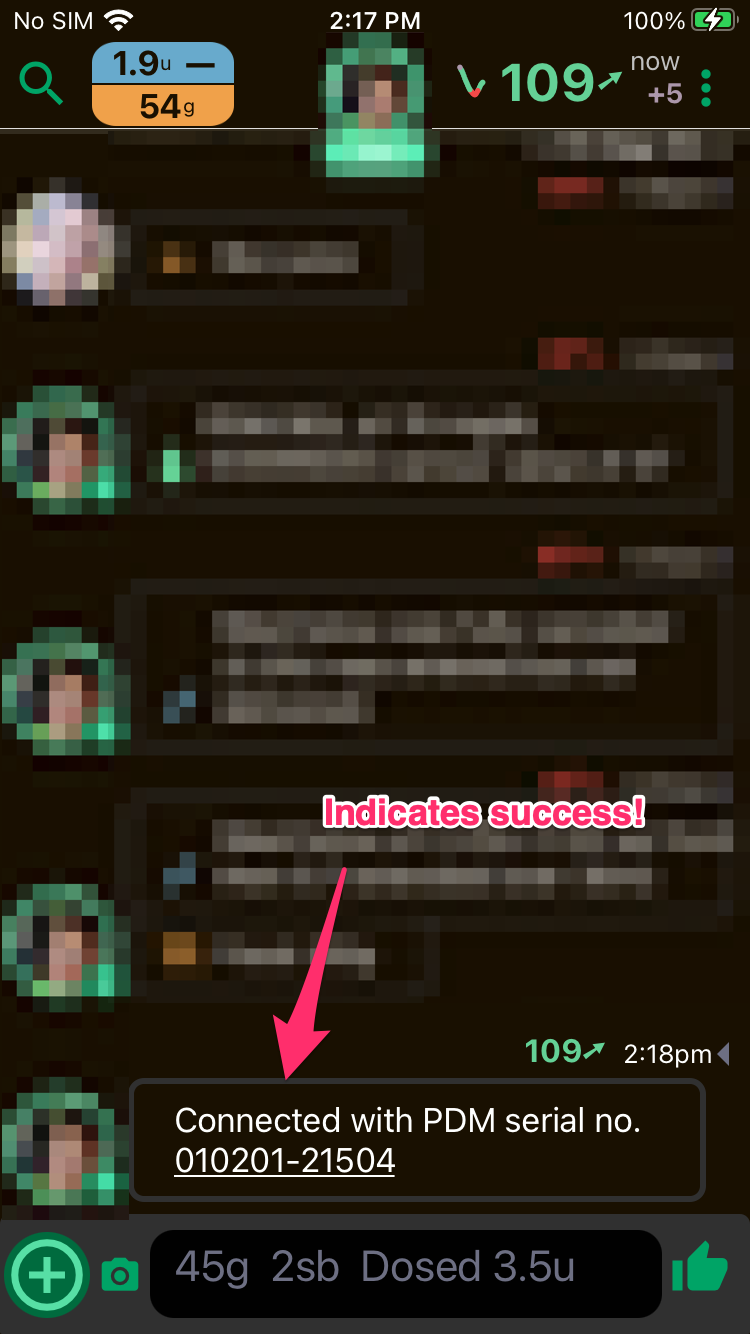
Gluroo will associate the recent request it saw from Omnipod View from your IP address with the Gluroo account you’re logged in to. You should then see a “Connection” message appear in your Gluroo Entries Log back on the main Gluroo screen:
Questions or feedback: please write info@gluroo.com with “Omnipod Connection” in the subject.