Introduction
- First, there are real time monitoring dashboards that you can leave open on an extra monitor or tablet to keep a closer eye on your or your PWDs blood glucose levels.
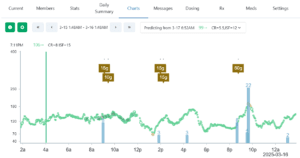
- Second, there are various tabs you can browse that replicate functionality from the app. For instance, you can look at your Chart on a bigger screen, or see your history of Messages in a full web view.
- Third, there are tools that your clinician/endocrinologist can use to interact with you, including advanced analytics, charts, reports, and other insights. Just invite them to use Gluroo from in the app: Menu > Care Teams > Add Care Team.
- Lastly, there is an Insights Report that you can open up to see some of those same charts, analytics, and summary statistics for yourself! To access this, just log in, tap the PWD name under "GluCrews", then look for the document icon on the right side of the screen.
Quick Start & Logging In
- You can sign up with an existing Google account or Apple ID.
- Gluroo does not have access to your password; authentication is handled by Google/Apple.
- If you need to reset your password, do so through your Google or Apple account.
- To log out, go to Menu > Sign Out. Log in again by choosing the same Google or Apple account used during sign-up.
- Make sure you’re using the same Google/Apple account that you used at registration.
- If you forgot your password, reset it through Google or Apple (since Gluroo doesn’t store these passwords).
Managing Your GluCrew
- Go to Menu > GluCrew and tap Invite new crew member.
- You can share an invitation link, a QR code, or have Gluroo email the invite.
- Ideally, each person should have their own email or Apple ID.
- If that’s not possible and you both use iOS, you can use one Apple ID to create separate Gluroo profiles. See this YouTube tutorial for help.
- If you accidentally set the wrong person as the PWD, first ensure you have at least two members in the GluCrew. (See the above question for how to invite other people.)
- Go to Menu > GluCrew, tap Set the Person with Diabetes, and choose the correct member.
Device Compatibility & Connections
- Dexcom G5, G6, G7, One+* (all via Dexcom Follow/Share)
- Freestyle Libre 2, Libre 3, Libre 3+ (via LibreLinkUp)
- Other CGMs may be supported via:
- Gluroo Local Integration (GLI) – Reads glucose data from Android notifications (e.g., Medtronic Guardian 4, CamAPS, xDrip+, BYOD).
- Gluroo Global Connect (GGC) – Nightscout-compatible backend. If your CGM data can be uploaded to a Nightscout URL, you can connect it to Gluroo as well.
- Go to Menu > Settings > CGM.
- Select your CGM type (e.g., Dexcom, Libre).
- Enter your username and password for Dexcom Share or LibreLinkUp. For Libre users, follow this guide for detailed steps: https://gluroo.com/support/libre-cgm-troubleshooting/
- Tap Login; you should now see your CGM readings in Gluroo.
- Ensure Dexcom Share is enabled in the Dexcom app (under Connections or Share tab).
- Make sure you have at least one Follower set up.
- Confirm you used the same Dexcom username/password in Gluroo. Try signing out of the Dexcom G6/G7 app itself and then logging back in to double check that you know the exact username and password.
- If issues persist, email help@gluroo.com.
- AAPS
- iAPS
- Trio
- And more.
- Currently, only BGMs that write into Apple Health on iOS are supported for direct connection.
- More BGM integrations are planned for the future.
Logging & Tracking
- For Dexcom and Libre CGM sensors, tap the Camera icon in Gluroo and scan the UPC/barcode with your camera. This will automatically log a sensor with the serial number and sensor calibration code, if available.
- After the New Sensor message has been logged, it will be tracked in the Devices tab, along with information like the sensor start date and the expiration date. You'll also receive a notification before the sensor expires, helping you plan ahead for when you'll need to change it.
- Tap + > New… > Sensor.
- Type in the sensor code/lot number.
- Take a picture of the meal and use AI to automatically estimate the nutritional content. Just tap the Camera icon in Gluroo and take a picture of your food.
- Describe your meal in natural language, then use AI to estimate the nutritional content. Tap the text field, then select one of the hashtags like "#breakfast", "#lunch", etc. Then, type a description of your meal, for example "A smoothie with a half cup of mixed berries, oat milk, half a banana, 2 tbsp peanut butter, and some chia seeds." After you press send, Gluroo will use AI to estimate the nutritional content of the meal.
- Use the UI by tapping + -> Meal. Then enter the amount of grams of carbohydrates in the meal, along with a description, and press send.
- Type the meal info directly into the text field. This is helpful if you already know exactly what you're eating and want to log it as quickly as possible. For example, tap the text field and type "30g avocado toast", then press the Send arrow. Gluroo recognizes this as 30 grams of carbs and updates your Carbs on Board (COB) in the top left header
- Tap + > Bolus (or Basal).
- Or type it into chat: “Dosed 2u 5m ago” → Gluroo logs a 2-unit dose, given 5 minutes earlier. You can make this even faster by just typing "2u", then once the message is logged, swipe it to the left to change the time of the meal to 5 minutes earlier.
- Long-press on the entry in the chat.
- You can change the time, remove it, or update details.
- You can also change the time by swiping to the left or right on any message.
- Menu > Settings > Basics.
- Select your preferred unit under Blood Glucose Units.
- Navigate to Menu > Settings > Basics.
- Under “Target BGL Range”, select “Use a tight range”.
- Menu > Settings > Insulin.
- Set Insulin delivery type to MDI.
- Under Multiple Daily Injections, adjust Dosing Accuracy as preferred.
- Gluroo's digital dosing table is a digital recreation of a table that your endocrinologist or clinician may have provided you. The table can be used to quickly see how many units of bolus insulin you might dose for a specific amount of carbs in a meal.
- To access the table, first go to Menu > Settings > Carb Ratio & ISF. Here is where you can tell Gluroo your Carb Ratio (CR) and Insulin Sensitivity Factor (ISF) throughout the day. For example, you might have a CR of 1:8 and an ISF of 1:15 in the morning (4am to 10am), and a CR 1:10 and ISF 1:20 for the rest of the day (10am back to 4am). Once you have input those splits, the Table (Menu > Dosing Table) will now show a quick reference guide for how much insulin you might dose based on the current time of day.
- To use it, let's say you're going to eat 50g of carbs for lunch and your current BGL is 160 mg/dl. The table would show 5 units of insulin corresponding to 50g, and 3 units of insulin corresponding to your ISF (1:20) to correct you back to the 100 mg/dl target.
- You should always consult your health care team to find your CR and ISF.
Language & Regional Settings
- Menu > Settings > Display
- Under Preferred Language, choose a new language.
- Gluroo supports English, Spanish, Italian, German, Japanese, French, etc.
- To help improve translations, email help@gluroo.com.
Troubleshooting
- Make sure that you can see readings in the LibreLinkUp app for the person with diabetes that you intend to see.
- Then, check your account info in the LibreLinkUp app by going to “Account Settings”. Make sure that you are providing Gluroo with this correct information. Try logging out of LLU and back in to verify that you know exactly what your username and password are.
- First, check that the Dexcom or Libre servers are not having any issues. Then, check that your desired CGM is connected in Gluroo by tapping the menu icon then CGM. Look for the “Connected” text underneath your CGM username and password.
- You can also try restarting the CGM connection by going to Menu > Connections > CGM > Dexcom Share and tapping “Remove Dexcom connection” and then tapping “Login to Dexcom” again.
- On Android, check that battery optimization is disabled (see above question)
- Note that on iOS, there are limitations to how often an app can update in the background, which affects how often Gluroo can reflect a new reading. Unfortunately, there is not much we can do about that at this time. We are at the mercy of Apple and what behavior they allow on their operating system. Another thing you can try to do is use the app more often. This can demonstrate to the OS that background services should be kept in-memory for that app. (Seriously, they track how often you use the app and use that to limit background activity or not.)
- Verify that notification channels (on both iOS and Android) are enabled. Navigate to Menu > Settings > Notifications, then tap the shortcut "System Settings" to go to the system notification settings page. Gluroo uses notifications to keep the app alive in the background. If you have those notifications blocked, then the app will not be able to function as well. Pay special attention, on Android, to "Ongoing status" and "background service" channels.
Gluroo displays the PWD’s blood glucose level on the iOS app badge. If your BGL units are mmol/L, you may see a very large number—e.g., if your BGL is 10.9 mmol/L, the badge might show 10,900 because iOS only allows whole numbers in badge icons.
You can disable badges via:
iOS → Settings → Gluroo → Notifications → Badges (toggle off)
- Disable and re-enable it in Gluroo, under Menu > Devices > Other tab. Log something in Apple Health (exercise, food, or a CGM/fingerprick reading), wait up to 30 minutes, and see if it comes through to Gluroo.
- Restart your phone.
- If none of the above work, re-install Gluroo and repeat.
- Gluroo reads from Apple Health whenever the Gluroo app is opened. Note that this the only way we can pull this data. When the iPhone is locked, there is no way to access Apple Health data.
First, see the OP5 integration document on our blog:
https://gluroo.com/support/integration-omnipod-5/
- Ensure the PWD’s phone has Notification Access enabled for Gluroo (via Menu > Settings > Gluroo Local Integration > Approve Notification Access).
- Note that Glooko is not real-time. If you changed your Glooko password, update it in Gluroo.
- Log in to the Glooko mobile app to accept any new terms of service, if needed. You must have logged into the Glooko mobile app at least once to enable their API.
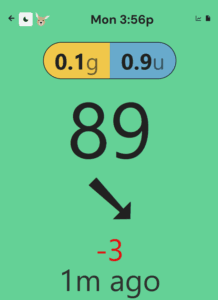
- To access the Chart, just tap your blood glucose level in the top right of the app. This will open the chart overlay. You can then pin it to always show by tapping the pin button in the top right of the overlay.
- To access the COB/IOB tab, just tap the yellow and blue COB/IOB button in the top left of the main screen of the app.
- To access the Devices tab, you can still see the remaining days until expiration for all of your pump pods, CGM sensors, transmitters, etc. by going to Menu > Device Status. When your devices are near expiration, they will re-appear automatically in the top header of the main Gluroo screen.
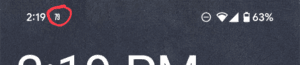 On Android, you can see your current blood glucose level (BGL) in the status bar (the top tray) by making sure that you notifications from Gluroo are enabled. Specifically, you need to ensure that the "Ongoing" notification channel is enabled.In Gluroo go to Menu > Settings > Notifications & Alerts, then tap the shortcut to "System Settings". Scroll to the bottom and ensure that "Ongoing" is enabled.If the notification icon still isn't working:
- Check that you are not in Do Not Disturb (DND) mode. If you are, you need to make an exception for Gluroo to still notify you in DND mode. In Android Settings, go to Modes > DND > Apps, and add Gluroo to the list of apps that can interrupt your DND mode.
- Sign out of Gluroo and back in. Sometimes this can fix an issue where notifications are not being delivered properly.
- Restart your phone.
Diabetes Education
- TIR (Time in Range) is the percentage of time your BGL is between 70–180 mg/dL (3.9–10 mmol/L).
- TITR (Time in Tight Range) is the percentage of time your BGL is between 70–140 mg/dL (3.9–7.8 mmol/L).
For example, say you have five BGL readings in a day: [65, 82, 101, 143, 197]. Three of these (82, 101, 143) are within 70–180, so TIR = 3/5 = 60%. Only two of these (82, 101) are within 70–140, so TITR = 2/5 = 40%.
- Bolus insulin is fast-acting (“rapid-acting”) insulin—used for meals or correcting highs.
- Basal insulin is slow-acting, helping keep blood sugars steady throughout the day.
Account Information
To delete your account:
- If you are the only member in your GluCrew:
- Go to Menu → GluCrew
- Tap “Delete this GluCrew”
- If you are in a multi-member GluCrew:
- Go to Menu → GluCrew
- Tap “Remove myself from this GluCrew”
- You’ll be logged out and removed from that GluCrew.
- Then, log back in and return to the same page, and you’ll see “Delete this GluCrew.”
When you delete your account, all your data (CGM readings, logged meals, messages, etc.) is permanently erased. Deletions can take up to 5 business days to process.
As a workaround:
On your iPhone:
- Go to Settings → [Your Apple ID] → Password & Security → Apps Using Apple ID → Gluroo
- Choose “Stop Using Apple ID.”
- You will be prompted again next time you log in.
- On the iPhone, invite your new Google account to your GluCrew by going to Menu > GluCrew > "invite new GluCrew member".
- Accept that invitation on your Android phone and get Gluroo working there. At this point, both the original Apple account and the new Google account should be in the same GluCrew and are able to access all of the same data.
- On the new Android phone, you can change the Person with Diabetes (PWD) to be your Google account by navigating to Menu > GluCrew > "Set the Person with Diabetes".
- Done! You now have full access to your GluCrew and data on the new phone. If you'd like, you can also remove the old Apple account from the GluCrew by pressing the red "minus" button next to their name, OR, on the iPhone, pressing "Remove myself from this GluCrew".
Advanced Uses
To export your data to a CSV, just navigate to Menu > Insights > Data Export and follow the instructions. After providing an email address and waiting up to an hour, you should get an email with a zip file. The zip file contains the CSV of your data. Below is a brief description of the columns in the dataset:
- date: the date and time of the entry.
- bgl: blood glucose level
- trend: the trend of the blood glucose reading, reported by the CGM. For example: FLAT, FORTYFIVE_UP, SINGLE_UP, DOUBLE_UP, etc.
- eventType: whether the entry is a CGM reading, or a logged message
- senderId: the user ID of the person (or system, in the case of an automatic integration like the OP5 or Glooko) who logged the message.
- text: the raw text of the message.
- template: If the message is from an automatic integration, the template shows what type of message it was.
- msgType: More broadly, describes the type of the message. For example: was it a meal, or an insulin dose, or exercise, or a text message?
- affectsFob: Does the message affect the amount of Food on Board?
- affectsIob: Does the message affect the amount of Insulin on Board?
- doseUnits: If the message was an insulin dose, how many units were dosed.
- foodG: If the message was a meal announcement, how many grams of carbohydrates were logged?
- food_...: Grams of sugar, fat, protein, etc.
- doseAutomatic (OP5 only): was the dose administered automatically or manually?
- description:
- fpBgl: if the message was a fingerprick, this shows what the logged fingerprick reading actually was.
- actionMins: The duration of the insulin bolus.
- exerciseMins: The duration of exercise.
- exerciseLevel: The intensity of the exercise.
Alternatively, you can go to app.gluroo.com and sign in to see Simple Status, Chart Status, and Gluroo Insights.
You can use these methods to share a report of your data with your endocrinologist or other clinicians on your healthcare team. If you want to share a PDF report:- Visit app.gluroo.com on a desktop PC and log in.
- Click on your name.
- On the right side of the page, click the document icon to go to the Gluroo Insights Report.
- Open your browser (e.g. Google Chrome) menu and click "Print...".
- Select the "Print to PDF" option.
Yes! You can get readings from xDrip+ into Gluroo using xDrip’s Cloud Upload option.
- Make sure you see readings in xDrip.
- In xDrip, enable “Nightscout Sync (REST-API).”
- In Gluroo, go to Menu > Settings > CGM and set “DIY via Nightscout.”
- Then go to Menu > Settings > Gluroo Global Connect Nightscout. Tap “Copy”, then "Copy" again next to “xDrip+.” This copies a special link for xDrip.
- In xDrip, go to the Nightscout Sync settings (Settings → Cloud Upload → Nightscout Sync (REST-API)) and paste the copied link under “Base URL.”
After a few minutes, readings should flow into Gluroo. Please wait up to 30 minutes.
Yes. As long as your system can connect to a Nightscout instance, you can use Gluroo.
- Go to Menu > Settings > Insulin in Gluroo.
- Tap DIY Loop as your Insulin Delivery method.
- Copy the Nightscout URL and API Secret.
- Paste those into the Site URL and API Secret fields in your DIY system.
Data should begin syncing to Gluroo soon after.
If data from your DIY system is flowing to Gluroo, you can also forward certain logs from Gluroo to your Nightscout URL. Note that Gluroo does not forward CGM values it retrieves; you must still have your own Nightscout instance to fetch CGM values. Gluroo will forward items like meal announcements and insulin doses.
This requires advanced configuration in Nightscout. Briefly:
- Log in to your Nightscout site as Administrator.
- Click the hamburger menu → Admin Tools.
- Under Subjects, click Add new Subject.
- Enter “Gluroo” (or something recognizable) under Name, and “admin” under Role.
- Click “Save” to generate a new Access Token.
- Paste that Access Token into Gluroo in the relevant field.
- Tap “Test Connection.”
Indications and Intended Use
- Gluroo is intended for use by Users wishing to collaboratively log, create and review contextual notes regarding diabetes control, where they will be available for use by other Gluroo software applications.
- Users include, but are not limited to: People with diabetes using diabetes devices, clinicians and caregivers.
- Gluroo is intended for collaborative logging and management of diabetes and is explicitly not intended to be used for making real-time dosing decisions.
- are diagnosed with diabetes, type 1 or type 2
- are also under the guidance of a doctor or other healthcare professional
- are physically and mentally able to independently manage their diabetes therapy
- are able to proficiently use a smartphone
Warnings
- Dosing decisions should not be made based on this device. The user should follow instructions on the continuous glucose monitoring system.
- Gluroo is not intended to replace self-monitoring practices as advised by a physician.
- Gluroo has not been reviewed or cleared by the US FDA.